3M Vinyl Tape pulled Paint

Craigbro63

Promoted Users
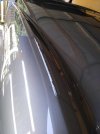
I've been cutting & buffing over the last 4-5 days and using 1/4" 3M blue vinyl tape (471) on my edges as this is my first full paint job. I've got about 70% done and all was going well until today when I removed the tape from the top edge of a front fender. As you can see in the picture the paint pulled off on about 10 inches of the edge.
The car has been sitting for a little over 6 weeks after clear coat and has been sanding and buffing fine. I would assume being no other area had this issue that maybe there was maybe some sort of contaminate under the area?
Anyway, I would appreciate advise on how to repair the area.
 

Attachments

  • Fender Paint Peel.jpg
    Fender Paint Peel.jpg
    125.6 KB · Views: 179
Oh that's just heart breaking, I feel your disappointment. Out of curiosity, how long was the tape on?
 
The tape was on around 20 hours. I had both this tape and the green 3m masking tape on other areas that I was working on for a couple days with no issues.
 
I just looked at 3m's tech sheets for adhesion properties. The blue vinyl has a higher adhesion than the green. They also state that adhesion can be increased by the amount of pressure used when installing, and increased working surface temperature.
 
Man, I had read that the vinyl is what I should be using. I imagine the regular blue painters tape would be the way to go. I'll swap.
Any advice on repairing this area?
 
Never leave the tape on a new paint job overnight, or good chance this will happen with any kind of automotive tape and any paint job painted in the last six months.
So you know this had nothing to do with your prep or adhesion, just a matter of one spot had been applied a little wetter and tape being waterproof and airtight kicked back solvent and can reflow clear and or base.
This is why you only see a few spots that pull off and usually top flat part of the car.
 
Last edited:
Thanks , good to know. Any advise on repairing this? Can I just mask off the area and sand, epoxy, base, clear or how should I proceed?
 
Texasking, Thanks for the reply. Looks pretty straight forward but a couple of questions:
Can you explain "blend"?
Also, this is a Karmann Ghia and there's not typical body panels. The entire front end up to the doors are a solid wrap around piece, minus the hood. Would you maybe have a recommendation for the clear rather than shooting that whole area?
 
The only right way to do a repair like that is to reclear the fenders and nose completely. The blend is the part where you only use enough basecoat to get coverage on the repair area. This is a very common repair procedure.
 
Once you have it prepped as Texasking stated, you will spray one coat of color over the repair area. Let flash and then spray another coat extending a bit past the first coat in all directions. Let flash and then spray another coat extending past the previous coats in all directions. by now you shouldn't be able to tell where the repair was or see any difference in color between the repair area and the adjoining panel. This is the process of blending. You are basically getting the repair area covered with 3 coats of color while feathering the outside edges into the surrounding panel(s).

You will need to shoot your clear coats over the entire panel(s) to prevent any chance of peeling.
 
68, Appreciate the very clear description. I've already cut/buff so do I need to scuff everything or just waterborne wax/grease and re-clear.
 
68, Appreciate the very clear description. I've already cut/buff so do I need to scuff everything or just waterborne wax/grease and re-clear.

As Texas stated you are going to need to go over everything with 800 wet. Search "blend" or "blender", I've gone into a lot of detail on how to do this in the past.
 
Back
Top