Welding Question

Joe in NY

Promoted Users
I've made up a patch panel that will have no access from the back when I'm welding. I have a tough time keeping panels from warping under the best of conditions. Other than going very slowly and cooling short welds can anybody offer some suggestions how to keep things from warping?
 

Attachments

  • IMG_9152.JPG
    IMG_9152.JPG
    77.9 KB · Views: 92
On a panel like that, I would make 2 stitch welds, then let it cool, then 2 more and so on until done. blowing the air hose on them between welds helps. It will take 15-20 minutes to weld it that way. But will save you hours over smoothing out a warped panel.
 
On a panel like that, I would make 2 stitch welds, then let it cool, then 2 more and so on until done. blowing the air hose on them between welds helps. It will take 15-20 minutes to weld it that way. But will save you hours over smoothing out a warped panel.
How long of a stitch weld?
 
How long of a stitch weld?

A stitch weld to me when welding sheetmetal is one tack at a time. Using a piece of test material, set your welder up at a high voltage to make stitch welds. The idea here is to get on and off the mig gun trigger asap. This will reduce the affected heat zone, as well as reducing shrinkage. The longer it takes to apply a tack/stitch weld, the greater area is affected by heat, thus creating deeper shrinkage.

Your stitch welding should not be very high after tacking. The flatter the weld tack, the better. Thus the reason for using a test piece of material to dial your welder in.
 
Last edited:
JMO but with something you have no access to the backside, and you are using a MIG you have to accept that you will get some shrinkage. The trick is to minimize it. I differ slightly from what's been posted here in that I would just use tacks, running those stitch welds will cause it to shrink more than just tacking it alone, and I never would blow on it to cool it. The act of blowing on very hot/nearly molten metal will actually cause it to shrink.

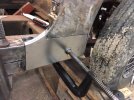
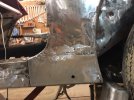
I would start by tacking it in, skipping around till it was holding on it's own. I would give it some time to cool after a few tacks. When you have it tacked in, slightly grind the tacks and use a wire brush on a drill to keep the panel clean and free from any cruddy buildup that you get when MIG welding. Then make a series of tacks, skipping around, approximately 1/2 distance from the first set of tacks. Again let it cool on it's own after every 3 or 4 tacks. Grind, brush it and repeat. Once the tacks start getting sort of close to one another then start making your tacks overlap your previous ground ones. This will help with not having pinholes. Again after each series of tacks grind some of the proud off. Take your time and let it cool frequently. Once you have "connected the dots" then grind flush and inspect for pinholes. There will be some so in those places tack again. Repeat this until you see no pinholes.

As for settings practice on scrap first. You want it hot but not so hot it just burns through. Experiment till you find the settings that work on your welder.

Doing it this way, provided you don't get in a hurry, you will have very minimal shrinkage. Easily will be covered by a skim coat of filler. Don't forget to treat the backside with some cavity wax or by sloshing some epoxy in there.
 
Last edited:
to repeat some older threads, i wound up way higher amps than i would have thought, but that allows only a split second of trigger while getting full penetration.
 
One more thing I will add, good fit is important, but with the MIG, having a slight (1/32) gap, or beveling the edges of the panels seems to work better than having a no gap fit. No gap is nice for a TIG where you have more control, slight gap works better with a MIG and helps keep the panel under control. Just what I have observed over the years.
 
Make the patch fit 100% tight with zero gap, any gap will shrink with the weld causing worse warping. If you start with a small gap you can watch it close up as you're tacking across the seam- that's the welds/heat affect zone shrinking, pulling the panels closer together and creating localized stress in the panel that causes warping. Butting the panels tightly prevents the HAZ shrinkage from closing up any gap.

Do one tack at a time, turn the settings up so you're only on the trigger for just a second to get full penetration- practice on scrap panels to see how much time it takes to get good penetration then only hold the trigger long enough for that- no more.

Do a series of tacks, let it cool naturally. Don't grind them yet.

Do the next series halfway in between the first to keep the panels flush. Once there are enough tacks to keep the panels aligned flush then start making the next series of tacks right against the other tacks instead of halfway between- the first set of tacks will act as as heat sink so less heat will spread into the metal surrounding the weld seam for a smaller heat affect zone, so there will be less shrinking/distortion. I can keep the HAZ down to only 3/8" wide by doing quick individual tacks and using the first rounds of tacks as a heat sink.

Another option that can help- lightly pre-stretch the edges to be welded via hammer on dolly stretching to counteract the weld seam shrinking.
 
Well, it came out good enough for the girls I run with. It's pretty straight and a little filler will cover any sins. Speaking of filler. I last bought a gallon of Rage Ultra in Dec. '19 for $52.00. I looked today and it's over $100! Good thing this is my last restoration or I'd have to go back to work. Thanks to everyone for all the good advice.
 

Attachments

  • IMG_9170.JPG
    IMG_9170.JPG
    62.6 KB · Views: 50
Back
Top