RosharonRooster
Promoted Users
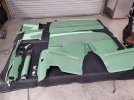
Thats all for now. Next update will be some wiring. And hopefully get it running. I have the custom harness and computer on order. Thank you everyone
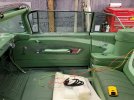
We are on parallel paths, at pretty much the same point of re-assembly. It is nerve racking!I also installed all the locks and got them working. This was an extremely nerve racking process. Maybe I over think it
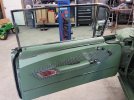
But it was 55 degree and I was sweating when I installed the door locks. I did my best to minimize material build up around the doors. But since the car has 5 coats of clear. There is build. I used a file and was able to get it all done without a big chunk of paint coming off. Thank God.
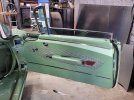
Notice the difference in OEM locking mechanism and hardware and the repop. I used my original retaining clips. Threw the China in the trash

Yessir. I'd rather use a little rusted 1/4 inch screw than use the one that comes with the repop if it doesn't show.. I dedicated a whole day to install the door and trunk locks. That was my objective that day. My buddy is the one who gutted them, so it took some trial and error to figure it out. And grease...grease helps everything function smootherWe are on parallel paths, at pretty much the same point of re-assembly. It is nerve racking!
And, I'm with you on the OEM vs. Repop. I saved and labeled all the OEM parts and find myself using as much as I can and throwing away alot of repop stuff I bought
Love your fuse block solution, very cool.
I'm currently fighting door locks as well. Finicky business that . . . frustrating and time consuming to be sure. When it is all done and working it seems so simple, but getting there is a "journey."
Yes! Grease. I've become a fan of the WD-40 spray grease.Yessir. I'd rather use a little rusted 1/4 inch screw than use the one that comes with the repop if it doesn't show.. I dedicated a whole day to install the door and trunk locks. That was my objective that day. My buddy is the one who gutted them, so it took some trial and error to figure it out. And grease...grease helps everything function smoother
I meant that the WD-40 Specialist Gel Lube is good for a lot of places where you would use grease, door locks, regulators, etc.I'll check it out.
My buddy turned me on to kroil. I bought some and I must say, it's better than pb blaster for rusted stuff.
Yeah that would be cool. I cut the piece to accept the courtesy light bezel. Impala didn't have that. It's a buick thing or cadillac.You know what would be cool? Open the ashtray (I think thats what it is) USB port underneath
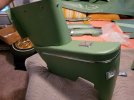
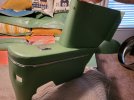
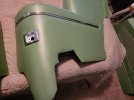
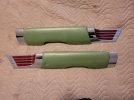
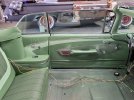
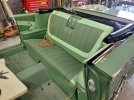
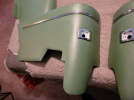
I'm sure you are going to restore a few more cars, so was the problem you had about getting the material to lay down flat around the edges when folding it over on a curve, or a cut out, maybe an arm rest?Wednesday update. I spent 4 hours on 1 small piece of all this about 2 weeks ago and threw in the towel. Broke down and took it to an Upholstery shop. Rear piston cover, and door arm rests are now done
i think the culprit to my problem was the glue i was using. i was using permatex orange rattle can with blue lid. ive used that glue on headliner and other random stuff and its good glue. but when i dropped off the parts. the guy did compliment my work on the 1 piece i was able to do . and then asked me what glue i was using on the big pieces and when i answered all he said was "hmm". then when i picked up he said they had to remove all the old glue i used. probably should use the landau glue, or contact cement in a spray gun. but i just havent bought a gun or tried with that. not to mention when i was working on these parts i was under the weather with a head cold and just wasnt feeling good. shop charged me 300 dollars to do the work. i thought that was a pretty good price?...I'm sure you are going to restore a few more cars, so was the problem you had about getting the material to lay down flat around the edges when folding it over on a curve, or a cut out, maybe an arm rest?
I always weigh shop price against how much time I think it will take me to do it.......then I usually end up working for $.10 an hourshop charged me 300 dollars to do the work. i thought that was a pretty good price?...
I asked the guy how long it took them and he said. About 6 hours....so that's 50 an hour. Minus foam and minus glue....I always weigh shop price against how much time I think it will take me to do it.......then I usually end up working for $.10 an hour
But I have fun doing it. I think you got a good deal on it.
It's a really small shop. In the hood....2nd or 3rd generationWell at least he is able to keep the business going so he can be there next time someone needs something done. Without profit or money coming in businesses close the doors. I know around here there are not many upholstery shops to choose from.
I've been reading up. I'm sure once me and my buddy do it. Well he does and i watch then I'll be able to say it was easy and maybe never go back to carburetorsYou probably already know, but just in case...
Dakota Digital makes a BIM module that connects the ECM to the Dakota Digital gauges, using the GM CAN Bus. Totally simplifies everything.