1964 GTO

Jsedacca

Promoted Users
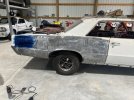
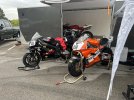
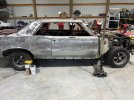
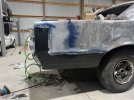
Now that the motorcycle race season is over with AHRMA, it’s time to start work on the GTO. Over the last couple of days, I pulled the exterior trim and began to strip the paint. I will be using a combo of strip and clean discs on my angle grinder and 80 grit on the DA prior to epoxy. I plan on pulling the drivetrain, cleaning/scrubbing/prepping the engine and reshooting it in the correct teal color for 64. This will also allow me to shoot the engine bag in black epoxy. I’ll update whenever possible and will certainly have questions along the way. Thanks guys!

Jared
 

Attachments

  • 21593448-0E2A-4D28-85E5-8B6F00994154.jpeg
    21593448-0E2A-4D28-85E5-8B6F00994154.jpeg
    188.8 KB · Views: 144
Thay Goat should be very sweet when you are finished. Post up pics of your race bike when you get a chance.

From the last race of the year at Barber Motorsports Park. I painted the 05 cbr1000rr and was my first attempt at a two tone. For a race bike, I am very happy with how it turned out.
 

Attachments

  • A6ECD013-A9B4-41A8-9AA8-2474C19EBF27.jpeg
    A6ECD013-A9B4-41A8-9AA8-2474C19EBF27.jpeg
    263.8 KB · Views: 109
Cool GTO. I'm have a 64 that I'm working on too. So...Was the factory color Aquamarine (P) or Gulfstream Aqua (Q)?
 
Cool GTO. I'm have a 64 that I'm working on too. So...Was the factory color Aquamarine (P) or Gulfstream Aqua (Q)?
It was cameo ivory over red interior. The blue at the rear of the quarter is layout fluid so I could take down some high spots.
 
Oh - Gotcha. You are painting the engine the correct color. I misread it the first time. Nice color combo.
 
Had a little bit of free time and decided to pull the front fender, inner fender, front nose panel and start stripping the door. So far, I’m very happy with what I’m finding under the paint.

Going to buy a media blaster to make prepping areas/pieces easier with crushed glass.
 

Attachments

  • EEAA005E-5903-462D-853E-B85B4A9417B2.jpeg
    EEAA005E-5903-462D-853E-B85B4A9417B2.jpeg
    196.9 KB · Views: 86
Had a little bit of free time and decided to pull the front fender, inner fender, front nose panel and start stripping the door. So far, I’m very happy with what I’m finding under the paint.

Going to buy a media blaster to make prepping areas/pieces easier with crushed glass.

Made good use of your time, lots accomplished. Good call on the media blaster, I really like the finish it leaves when using crushed glass media before epoxy. Imho, it's easy to do, media blast, blow off panel, epoxy. Yeah it's a bit messy but the results are well worth the effort.

Thanks for sharing your project restoration.
 
Got a quick question about door removal. I’m assuming removing the doors in the best way to get all the jambs/hinges prepped. With the car being cameo ivory and not metallic. Would you do the jambs, reinstall the doors and paint the entire car when the time comes? I know it’s probably not necessary because of the solid color but it will lessen the chances of paint damage upon door install. This will be my first overall paint so any tips or advise is greatly appreciated.
 
Painting jambs with doors off will get a nicer job and details in the jambs.
There are some great posts on here on how to back tape to avoid lines between jambs and body.
Here was was my BIG learning on this topic:
Make sure the whole car is truly ready to paint, all blocking, testing, obsessing etc. THEN pull the doors and shoot the jambs.
Otherwise you'll be doing endless masking and still get overspray and sanding dust etc on your beautiful jambs.
Ask me how I know...
Thanks Dean. When the time comes, I’ll pull the doors to prep the jambs and get everything ready for epoxy. Appreciate all the insight and recommendations.
 
Since the last post, I removed the entire front end, pulled the motor/trans and removed the rear bumper. I began blasting the rear tail panel and it uncovered tiny pin holes on the passenger side rear quarter that were close to the area that ties into the trunk drop out. Trying to weld the thin metal from years of rust would have only blown bigger holes. I decided to get a quarter panel skin from NPD and graft on the section I needed. I contemplated over and over whether I should attempt a butt weld or flange it. I know butt welded is the “proper way” and after taking my time and scribing before cutting, the fit came out excellent. I just placed a couple of tacks for now but so far so good. Just to be safe, I placed a copper backer on the area I was tacking.

My order of SPI epoxy in grey and black with the waterborne cleaner also arrived earlier this week. Still have more metal work to do and for the weather to warm up before spraying but really can’t wait to spray the epoxy.

Jared
264EF456-8479-48A2-979D-00D838913C59.jpeg
 

Attachments

  • 28B3BD92-C928-4C33-B25A-CE2AA3CB14F7.jpeg
    28B3BD92-C928-4C33-B25A-CE2AA3CB14F7.jpeg
    178.2 KB · Views: 44
  • 4EEEFC25-7765-4BD2-9755-9C97BFDCED94.jpeg
    4EEEFC25-7765-4BD2-9755-9C97BFDCED94.jpeg
    181.4 KB · Views: 48
  • BC561AD8-D245-459D-97CF-1CC5D36533F1.jpeg
    BC561AD8-D245-459D-97CF-1CC5D36533F1.jpeg
    131.7 KB · Views: 48
Back
Top