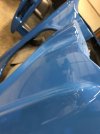
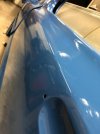
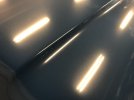
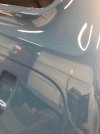
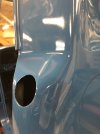
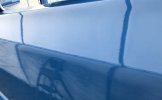
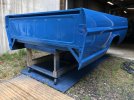
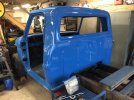
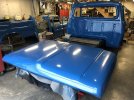
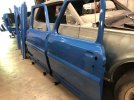
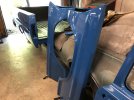
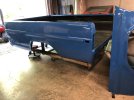
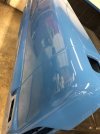
Looking for more advice from the experts here. I just completed “phase 1” of my first paint job. It came out about like I was expecting given the lack of a decent spay booth with adequate lighting and ventilation. I’ve got orange-peel on most of the panels and some dry spray areas in a few spots. I’ve learned a lot for the next spray, with lots of do’s and don’ts. I caught myself overlapping edges and corners more than once after losing track and ended up with a few runs and sags on the cab. And a few times ran along an edge too late to maintain that wet edge and causing some dry overspray. Not to mention the water that dribbled out around my face mask onto the hood…
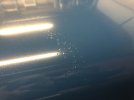
For some reason I got way more dust nibs than expected in the color. I was surprised when shooting the 25% reduced epoxy at how glassy smooth it went down, and almost no nibs that I had to sand out prior to the color. Last day was by far the worst when I did the cab and hood. Hanging the hood vertical would have helped, and moving around and accessing all areas of the cab and trying to keep wet edges, not drag the hose, etc was a real challenge. Only thing I can think of is that the nibs and trash accumulated over the three sprays, and I did realize far too late that I was not wiping down my hose each time between sprays… Pretty sure I was having a lot of residue coming off that hose on the 2nd and 3rd sprays.
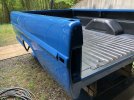
Anyway, original plan was to spray three coats of the single stage Motocryl, sand with 600, and then spray two more coats of color before a final cut and buff. This isn’t a show car, I didn’t even blast and spray the frame. I just want a nice looking driver I’m not embarrassed to say I did myself. I’m not going to get this one perfect and am always going to see those flaws that others won’t pick up on. I’m ok with some minor orange peel remaining as long as it’s consistent across all panels.
It seems like some people cut and buff after just 3 coats. Is that likely to get too thin in some areas trying to reduce the peel and remove the nibs?
I assume my best course of action is to sand everything nice and flat with 600 and then spray two more coats of color? I’m just not clear what two more coats will get me in the end.
Most of my confusion is regarding that final cut and buff phase. I’ve been through the “color sanding” thread but am still unclear as to best way to proceed. So many options and products… Is a power sander a better option than by hand? I had planned to do all hand sanding but the more I read it sounds like a hard block and 1000 to remove the peel and trash? Then random orbit through the grits to refine the scratches? I currently have a Dynabrade 6” 3/16” RO sander, and an old Porter Cable 5” RO sander.
If machine sanding is psa or hook & loop better?
Begin with 1000 by hand and progress through 1200, 1500, 2000, 2500, 3000 on RO?
When do you switch from dry to wet?
Which specific products and vendors do you recommend? Since I don’t have anything yet other than a roll of 600 grit, I’m trying to figure out what will be the best single source/system to go with.
Sorry for the long post and I do really appreciate the help and input.
For some reason I got way more dust nibs than expected in the color. I was surprised when shooting the 25% reduced epoxy at how glassy smooth it went down, and almost no nibs that I had to sand out prior to the color. Last day was by far the worst when I did the cab and hood. Hanging the hood vertical would have helped, and moving around and accessing all areas of the cab and trying to keep wet edges, not drag the hose, etc was a real challenge. Only thing I can think of is that the nibs and trash accumulated over the three sprays, and I did realize far too late that I was not wiping down my hose each time between sprays… Pretty sure I was having a lot of residue coming off that hose on the 2nd and 3rd sprays.
Anyway, original plan was to spray three coats of the single stage Motocryl, sand with 600, and then spray two more coats of color before a final cut and buff. This isn’t a show car, I didn’t even blast and spray the frame. I just want a nice looking driver I’m not embarrassed to say I did myself. I’m not going to get this one perfect and am always going to see those flaws that others won’t pick up on. I’m ok with some minor orange peel remaining as long as it’s consistent across all panels.
It seems like some people cut and buff after just 3 coats. Is that likely to get too thin in some areas trying to reduce the peel and remove the nibs?
I assume my best course of action is to sand everything nice and flat with 600 and then spray two more coats of color? I’m just not clear what two more coats will get me in the end.
Most of my confusion is regarding that final cut and buff phase. I’ve been through the “color sanding” thread but am still unclear as to best way to proceed. So many options and products… Is a power sander a better option than by hand? I had planned to do all hand sanding but the more I read it sounds like a hard block and 1000 to remove the peel and trash? Then random orbit through the grits to refine the scratches? I currently have a Dynabrade 6” 3/16” RO sander, and an old Porter Cable 5” RO sander.
If machine sanding is psa or hook & loop better?
Begin with 1000 by hand and progress through 1200, 1500, 2000, 2500, 3000 on RO?
When do you switch from dry to wet?
Which specific products and vendors do you recommend? Since I don’t have anything yet other than a roll of 600 grit, I’m trying to figure out what will be the best single source/system to go with.
Sorry for the long post and I do really appreciate the help and input.
Attachments
-
 31E8F690-76B3-4B66-86F0-8017C7FAED1D.jpeg54.7 KB · Views: 105
 -
 134A5896-CE15-4DF4-8763-CFA68A15D010.jpeg198.3 KB · Views: 107
 -
 A2A02EA6-7D94-4581-AD57-C8B024584D82.jpeg198.7 KB · Views: 109
 -
 849331B7-B3E3-4FBD-A3BA-E18832F6A918.jpeg152 KB · Views: 103
 -
 E0089899-49A6-43BF-8910-D1D2F36BB44A.jpeg163.5 KB · Views: 100
 -
 E295D261-6D8B-4983-A301-830A7A63C64F.jpeg138.5 KB · Views: 101
 -
 10383A45-A889-4387-9C7B-8CE94AFC7875.jpeg165.7 KB · Views: 92
 -
 94A26A40-0B36-4758-B739-96B87CE9477A.jpeg140.8 KB · Views: 88
 -
 40019F71-5532-4CFB-9C8B-2E19908A53DC.jpeg125.8 KB · Views: 92
 -
 45C509FD-F82E-4F6B-B15D-853F90A7D0B2.jpeg97.9 KB · Views: 99
")