You are using an out of date browser. It may not display this or other websites correctly.
You should upgrade or use an alternative browser.
You should upgrade or use an alternative browser.
64 Pontiac GTO - Basket case to beautiful (I hope)
- Thread starter 1_Wild_Cat
- Start date
1_Wild_Cat
Promoted Users
I guess I'll make a narrow little block to fit down in the recess. The chrome is really thin - so I guess I better be a little careful not to break through. Thanks for the help.
A hand-held sandblaster?I guess I'll make a narrow little block to fit down in the recess. The chrome is really thin - so I guess I better be a little careful not to break through. Thanks for the help.
Some people blast the whole bumper for epoxy, so like Crash said, breaking through is a no concern.
1_Wild_Cat
Promoted Users
The recess between the ribs is pretty narrow and the higher chrome portions show. I had to use a tiny dowel to get between them when I was removing the old paint. Maybe a pen type blaster would work but I would hate to ruin a good part - even in tough shape they are kind of expensive.
Glad to know that breaking through the chrome isn't the end of the world. I worried about breaking into the pot metal below the chrome, because it isn't like a steel bumper.
Thanks again everyone.
Glad to know that breaking through the chrome isn't the end of the world. I worried about breaking into the pot metal below the chrome, because it isn't like a steel bumper.
Thanks again everyone.
1_Wild_Cat
Promoted Users
So...It has been a little while since I have updated this thread. I don't have anything new on the tail housing restoration. It has been a little delayed by a lack of cash - a couple of other purchases ate into the hobby money. For example...I picked up a complete, standard bore 1964 389 engine. This is the block I planning to use for the engine build so I can stash the numbers block away.

Also, the Molnar 4" stroke forged crankshaft I ordered for the engine build was finished and so I had to pay for it too...

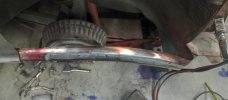
On the bodywork/metal finishing front...well the usual happened. While preparing to weld the new quarter panel patch in we discovered this...


We did realize there was something there, just not a 3" diameter hole with a huge "patch" pushed up and hammered down after being brazed in. Not sure what this was for -- There was an identical one on the other side but we cut that out when replacing that complete quarter.
No choice but to fix it...


As of today -- The quarter is waiting to be welded in while Cam catches up on some other client's work. After that I think that only a few metal finishing tasks remain (fingers crossed).
Also, the Molnar 4" stroke forged crankshaft I ordered for the engine build was finished and so I had to pay for it too...
On the bodywork/metal finishing front...well the usual happened. While preparing to weld the new quarter panel patch in we discovered this...
We did realize there was something there, just not a 3" diameter hole with a huge "patch" pushed up and hammered down after being brazed in. Not sure what this was for -- There was an identical one on the other side but we cut that out when replacing that complete quarter.
No choice but to fix it...
As of today -- The quarter is waiting to be welded in while Cam catches up on some other client's work. After that I think that only a few metal finishing tasks remain (fingers crossed).
1_Wild_Cat
Promoted Users
I'm not hoping for perfection. The car was in pretty tough shape - but most are. Just gotta keep plugging away and someday I'll get to drive it...How about a graphic of everything we found and fixed...

1_Wild_Cat
Promoted Users
Don -- If it turns out half as well as the cars you build I will be very happy...
1_Wild_Cat
Promoted Users
1_Wild_Cat
Promoted Users
Thanks 123...Cam does killer work...A few more pics of this quarter repair...after some metal finishing.


Wetted to show the reflections...


Wetted to show the reflections...
MJM
Promoted Users
What an excellent job on a part that won't be seen. Kudos.
Absolutely, says a lot about the guy doing the work.
My eagle eyes picked up on the celco's used but, it appears there is a "bridge" that spans the two panels and is held in place by the celco's. I'm assuming that is a piece of metal with holes in it for the celco's to pass thru.
My question is, is the bridge home made, and if so, how thick is the bridge material. If it's not home made, where to buy that bridge?
I think that bridge is an excellent idea for panel alignment.
1_Wild_Cat
Promoted Users
My eagle eyes picked up on the celco's used but, it appears there is a "bridge" that spans the two panels and is held in place by the celco's. I'm assuming that is a piece of metal with holes in it for the celco's to pass thru.
Yes - there is a little bridge/clip that held by the Clecos. Cam makes them from different materials depending on what he need. Those are made from 18 ga., but he makes them out of aluminum and even oversize washers sometimes.
Wowsers! Nice metal finishing.
How about the Cleco holes? Weld and metal finish all over again?
I'll pass along your compliment. Yep - weld up holes and a little more finishing.
MJM
Promoted Users
Yes - there is a little bridge/clip that held by the Clecos. Cam makes them from different materials depending on what he need. Those are made from 18 ga., but he makes them out of aluminum and even oversize washers sometimes.
View attachment 28454
I'll pass along your compliment. Yep - weld up holes and a little more finishing.
Thank you for addressing my question with the accompanying picture showing the 18g bridging clips. I can see the advantages of using a system like this in certain situations, ie; on a high crowned area where using a magnet would not truly flush the two panels before welding, and eliminating a magnetic field to interrupt the welding arc from either tig or mig. Another question I have if I may with regards to Cams system. Why is he not welding up the cam lock holes before he metal finishes the panel? He has a reason for his means and method for filling in the cam holes last and metal finishing the panel again. For my own edification, what is it?
Sorry for the questions, no I take that back, I'm not sorry for the questions. I see a metal craftsman (cam) performing a task to the highest level of craftsmanship and I'd like to learn as much as I can from his knowledge. I understand some are not willing to share that information, but some will share and I'm all ears (eyes) in this case, to learn.
Thanks you,
Mike
123pugsy
Member
Thank you for addressing my question with the accompanying picture showing the 18g bridging clips. I can see the advantages of using a system like this in certain situations, ie; on a high crowned area where using a magnet would not truly flush the two panels before welding, and eliminating a magnetic field to interrupt the welding arc from either tig or mig. Another question I have if I may with regards to Cams system. Why is he not welding up the cam lock holes before he metal finishes the panel? He has a reason for his means and method for filling in the cam holes last and metal finishing the panel again. For my own edification, what is it?
Sorry for the questions, no I take that back, I'm not sorry for the questions. I see a metal craftsman (cam) performing a task to the highest level of craftsmanship and I'd like to learn as much as I can from his knowledge. I understand some are not willing to share that information, but some will share and I'm all ears (eyes) in this case, to learn.
Thanks you,
Mike
I'll take a stab at this.
I dabble in a bit of metal shaping.
I'll guess that he wants to planish the weld and get the panel into correct shape knocking on only the weld HAZ. (Heat affected zone). If he welded up the small holes, he wouldn't know which heat caused the shrinkage that was tugging on the panel causing any waves. Just a guess.
Then weld up the holes and if any waves occur in the panel, he will know they are from the new welds and not the main weld. He would then planish lightly on these new welds until the panel is back to perfection.
Does any of that even make sense? I'm having a hard time following it and I wrote it.