You are using an out of date browser. It may not display this or other websites correctly.
You should upgrade or use an alternative browser.
You should upgrade or use an alternative browser.
69 Mustang Mach 1 Resto
- Thread starter Machspeed
- Start date
dhutton01
Backyard Hack
Pretty sure it will be visible.I get wanting to make everything perfect, but first maybe try the bumper on and see how it looks. That area may be completely covered from normal view, unless you are going to park it over mirrors, it might not be a problem at all.
dhutton01
Backyard Hack
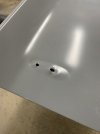
Yes the first one.I think I missed where the problem area is on the first look. There's just the one photo of that area?
metalman
Oldtimer
I missed that photo. Took me a couple minutes to see where that was located.Yes the first one. View attachment 30334
Machspeed
Member
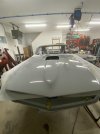
Had a friend come by yesterday who owned a collision repair shop for years, taught in the local automotive Vo-Tech and is a huge Mustang guy. In other words, he knows his stuff! He told me, the fit I was getting was typical and then commenced to helping me make it fit. With some hammer and dolly work and elongation of some holes we were able to get a very satisfactory fit.
After fitting up the front valance, he then helped my fit up the re-pop shaker hood I purchased years ago. We had to do a little bending, but overall smooth as butter and the fit is great!!! What a great day!!!
So appreciate the comments and thoughts here, my friends. Thank so much for that!!!


After fitting up the front valance, he then helped my fit up the re-pop shaker hood I purchased years ago. We had to do a little bending, but overall smooth as butter and the fit is great!!! What a great day!!!
So appreciate the comments and thoughts here, my friends. Thank so much for that!!!
Machspeed
Member
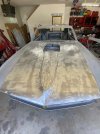
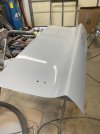
I've been working more with the hood and found a couple things I'm not happy about. First is the trim ring for the shaker scoop. It appears that when they cut it and drilled the hood, they did not have their template correctly positioned. As such, the ring is shifted to the passenger side a little. I could slot all ten holes a little to move it over, but then I'd have to fill the three exposed holes on the passenger side. I'm a little nervous in warping this thin skinned re-pop hood. Really not sure what I'm going to do here. Pissed that this ever left the seller and more miffed that I did not do a better job inspecting it when it came in all those years ago.

The other issue is an uneven edge at the passenger side front of the hood where it runs along the edge of the headlight bucket. I kept trying to adjust the headlight bucket to acquire the desired gap width but could not. After closer inspection with a straight edge, I found out why. It appears that they crimped the outer skin too far in at the factory. I can fix this with some welding rod, I think.

Jeez, nothing has been easy. I guess this goes along with the saying, "nothing worth doing is ever easy". ARGHHHHH!!!
The other issue is an uneven edge at the passenger side front of the hood where it runs along the edge of the headlight bucket. I kept trying to adjust the headlight bucket to acquire the desired gap width but could not. After closer inspection with a straight edge, I found out why. It appears that they crimped the outer skin too far in at the factory. I can fix this with some welding rod, I think.
Jeez, nothing has been easy. I guess this goes along with the saying, "nothing worth doing is ever easy". ARGHHHHH!!!
rusty428cj
Rusty Gillis
Nothing fits a Classic Mustang the first time. Some require a little work some major surgery to get the parts to fit.
'68 Coronet R/T
Oldtimer
Where you purchase your replacement parts makes a difference as well.
When doing my signature car, I made the mistake of buying Goodmark Quarter Panels for it. When installing them I noticed the side marker light from one side to the other was off by 3" and the body line that was supposed to center on the side marker light was off by 1/2" on the "good" side.
Later, I tried an AMD cross member floor support for a 1965 Buick Special and it fit perfectly. That car also needed floor pans and he had Goodmark replacements. The sides fit well but the center line was only good for the first half and then so far off at the transmission hump I had to fabricate a wedged shape piece about 4' long and weld it in place.
Hence, all the replacement panels I got for my GTX were from AMD. Were they perfect, not exactly but very close and needing minor fitting adjustments.
Machspeed
Member
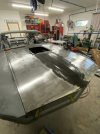
Been working on the hood to get it just right. As noted above in a previous post, the hood cut out for the shaker scoop was slightly off centered requiring some refitting. I elongated some holes and moved the ring over slightly. With a dolly and hammer to the ring, I was able to get it to fit better.
I then decided, for piece of mind, to strip the E-Coat. I've read too many horror stories on this and actually have an unused qtr panel that is rusting from under the E-Coat. Anyway, after about four hours of work with some 3M stripping discs and a HF Bauer Metal Conditioning tool, I was looking at metal. That job was not one I took pleasure in and the mess I made in the shop was one that will take years to clean up fully. Not to mention that the E-coat was a quality one with no underlying signs of rust....arghhh! As such, I'm leaving the underneath portion of the hood alone. I'll rough it up and spray over it with epoxy. I sprayed a couple of good coats of epoxy over the hood and am quite pleased with it. Did I say that I love SPI Epoxy!
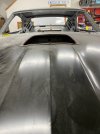
The trunk lid needed some work also as the spoiler was mounted incorrectly on the car and distorted the sheet metal. This is an OEM spoiler and I bought this car from the original owner, so it was likely mounted at the dealership where he bought the car. Anyway, I probably could have left it and covered it up with the spoiler mounts but I'd know that it was half azz and it would bug me, thus I fixed it with a shrinking disc and a little dolly and hammer work. And, just a little bit of filler.....just a little!!! Before and after pics below.
I then decided, for piece of mind, to strip the E-Coat. I've read too many horror stories on this and actually have an unused qtr panel that is rusting from under the E-Coat. Anyway, after about four hours of work with some 3M stripping discs and a HF Bauer Metal Conditioning tool, I was looking at metal. That job was not one I took pleasure in and the mess I made in the shop was one that will take years to clean up fully. Not to mention that the E-coat was a quality one with no underlying signs of rust....arghhh! As such, I'm leaving the underneath portion of the hood alone. I'll rough it up and spray over it with epoxy. I sprayed a couple of good coats of epoxy over the hood and am quite pleased with it. Did I say that I love SPI Epoxy!
The trunk lid needed some work also as the spoiler was mounted incorrectly on the car and distorted the sheet metal. This is an OEM spoiler and I bought this car from the original owner, so it was likely mounted at the dealership where he bought the car. Anyway, I probably could have left it and covered it up with the spoiler mounts but I'd know that it was half azz and it would bug me, thus I fixed it with a shrinking disc and a little dolly and hammer work. And, just a little bit of filler.....just a little!!! Before and after pics below.