You are using an out of date browser. It may not display this or other websites correctly.
You should upgrade or use an alternative browser.
You should upgrade or use an alternative browser.
Burn through on my hood./ Need some advice.
- Thread starter Mando
- Start date
dhutton01
Backyard Hack
DimensionCan you remind me what base you used?
I don't have any repair experience with SW lower end stuff, only their top of the line junk ") The reducer I used had activator in it, but I doubt the Dimension reducer does. It is also one of the non-sandable bases. Sand it and you lose adhesion. But according to the rep and training classes, denibbing small spots was ok. So small spots of no adhesion was ok. Kind of like needing to spray etching primer on any spot bigger than a quarter before 2K. I guess dime sized spots of poor adhesion was ok When priming the spot, just spray a couple light coats and sand lightly so you don't hit the base again.
The reducer I used had activator in it, but I doubt the Dimension reducer does. It is also one of the non-sandable bases. Sand it and you lose adhesion. But according to the rep and training classes, denibbing small spots was ok. So small spots of no adhesion was ok. Kind of like needing to spray etching primer on any spot bigger than a quarter before 2K. I guess dime sized spots of poor adhesion was ok When priming the spot, just spray a couple light coats and sand lightly so you don't hit the base again.
The reducer I used had activator in it, but I doubt the Dimension reducer does. It is also one of the non-sandable bases. Sand it and you lose adhesion. But according to the rep and training classes, denibbing small spots was ok. So small spots of no adhesion was ok. Kind of like needing to spray etching primer on any spot bigger than a quarter before 2K. I guess dime sized spots of poor adhesion was ok When priming the spot, just spray a couple light coats and sand lightly so you don't hit the base again.To Mando another quick way if this is not a top shelf restoration and used in a collision shop is have a heat gun in hand ......spot base in light coat then lightly go over with heat gun then another coat . This is just a maybe way to get by and may still lift the fresh base. I do not use SW products at all. If me I would spot in a little epoxy primer first and let dry over night with good heat in shop and wet sand 600 and then base. Good luck
Thanks guys for your help. Thank you Don for explaining to me how how to add the activator to the base. Since I have the hood completely sanded with 600, I think its too late to just spot spray the burn through areas only so I guess the next thing to do is re-shoot base and clear. Should I spray high build primer again and than block sand the primer before the new base and clear or can I just shoot the new base and new clear since there is plenty of primer there from the first time. I want to make sure that the new base will adhere to the previous base without any problems. This morning I am going to check and see if there are any fine scratches from the 600 grit and if there are, I think I am going to use some finer grit to get rid of the scratches. Texasking, since I have sanded the hood again with 600, are you saying that I am going to have adhesion problems when I spray the hood again? If yes, I think I am in a mess, darn it. At this point, what is the best case scenario for me to do?
RosharonRooster
Promoted Users
I agree with Toro. I'm a backyard hack and I've been in this pinch before. I would spot epoxy it to "lock it down". Wait over night. Then I would either spot base over the epoxy and feather it out with gun, or just rebase the whole panel. It's already the color so 3 coats in the affected area and 2 coats in the rest. Then clear.To Mando another quick way if this is not a top shelf restoration and used in a collision shop is have a heat gun in hand ......spot base in light coat then lightly go over with heat gun then another coat . This is just a maybe way to get by and may still lift the fresh base. I do not use SW products at all. If me I would spot in a little epoxy primer first and let dry over night with good heat in shop and wet sand 600 and then base. Good luck
You won't have adhesion problems over the sanded clear. The base is what is not supposed to be sanded. As most have said above, spray a little primer or epoxy over the burn through spot only, sand lightly, then base.Texasking, since I have sanded the hood again with 600, are you saying that I am going to have adhesion problems when I spray the hood again?
'68 Coronet R/T
Oldtimer
Would really help to see pictures.
Some burn throughs are minor and can be fixed easily IF you activated your base coat.
Others require some serious work. Here's one that was on my signature car when I got a little aggressive trying to remove a speck of dust.

Here it is after blending and shooting clear.

Some burn throughs are minor and can be fixed easily IF you activated your base coat.
Others require some serious work. Here's one that was on my signature car when I got a little aggressive trying to remove a speck of dust.
Here it is after blending and shooting clear.
Mando, if your burn/break through looks like the pic above then lightly sand with 800 or 1000 to take off the sheen. clean the area with wax and grease remover then spray 2 light coats of 2 K primer on the break throughout. let dry for 24 hours than wet sand with 600. Blend your base on the repair only, then re-clear the entire hood with 3 coats of clear. You do not need to use a sealer if you do it as explained. IF YOU DO NOT PRIME IT, I GUARANTEE IT WILL LOOK LIKE A SMALL DENT THERE WHEN IT IS DONE!Thanks again guys for your expert advice. 68 coronet, thats what my burn through spot looks like. Did you sand it with 600,primed it and than base and clear? How did you correct the problem?
'68 Coronet R/T
Oldtimer
Here are the steps I took:Thanks again guys for your expert advice. 68 coronet, thats what my burn through spot looks like. Did you sand it with 600,primed it and than base and clear? How did you correct the problem?
1. Sand the entire panel where the sand through is with 800-1000 until dull.
2. Mask off the rest of the car to prevent over spray from getting on your nice paint leaving only the panel you are working on exposed.
3. Now mask off the panel you are working on (this will be removed before clearing) making sure to leave plenty of room around your sand through for your blend. You don't want to mask too close or you'll leave what they call a tape line.
4. Wipe your panel clean with Wax and Grease Remover. Let this dry while you get ready to spray - 20-30 minutes.
5. I mixed up a small amount of reduced clear to use as an "inter-coat." This is done by using 30 parts clear, 10 parts hardener, 90 parts reducer. You can buy SPI inter-coat clear for this step if you prefer but this was my first attempt so I chose to follow someone's suggestion to use reduced clear instead.
6. Spray the blend area with the reduced clear using light coats as you would base coat. You want to go past the sand through area with each pass but do not go all the way to your masking tape. Stop a couple of inches short of that and using your wrist you want to sweep the gun away from the surface. Imagine you are spraying an inside 90 degree corner and you have to turn your wrist to keep from loading the paint into the corner. You will start and stop your passes using your wrist in this manner.
7. Spray a couple of coats of the reduced clear with the second coat extending past the first coat to kind of feather the edge. Remember your base coat will be sprayed on this inter-coat so give yourself some room to work.
8. Allow this to flash while you mix your base coat. Mix your base exactly as you did when you first painted the car.
9. No need to sand just begin spraying your base coat very light coats. Make a couple of short passes over just your sand through for good coverage. Make sure to let each coat flash off. By now you will see that things are shaping up and the sand through is pretty much invisible.
10. Make a couple of more passes using the "wrist technique" with each pass going a little farther than the last but not reaching the tape line. Be sure to spray light coats of base until the blend is just the way you want it. You shouldn't be able to see any indication of the sand through at this point.
Here's the fender I blended but it is a small picture sorry.
11. Remove the masking from the entire panel where the sand through was and prepare to spray your clear coats over the entire panel.
Hope this helps. I am not an expert by any means but this worked for me and I hope it does for you as well.
Let me add, that I will always defer to the advice offered by the Pros on this site.
Last edited:
I am going to use 2K primer on the burn through areas but as I mentioned before, I have already sanded the complete hood because I am going to paint the hood again and re-clear. To do this, I wet sanded the complete hood with 600 and I was checking for scratch marks and I can see the mark scratches from the 600 grit. Do I have to sand more with finer grit or will the new base and clear cover the scratches. I want to make sure that I do it right this time so I can put my truck back on the road. My thought is that if I sand too fine, the new base will not have anything to grab to.
Of course, that is just my thought and its only a thought. What do I know? Thanks Guys.
Of course, that is just my thought and its only a thought. What do I know? Thanks Guys.
Ok guys, Got my hood painted and all done. I will probably start putting everything back together on Monday. I do have a question? The interior looks pretty good other than on the driver side rocker panel, its kind of faded. I guess because of me going in and out of the truck. Not now but at a later date, I want to paint the inside of the truck. Should I sand the inside with 400 or is 600 good enough for the base coat. Just want to know for sure so I can use the correct grit before painting. Thanks to all.
'68 Coronet R/T
Oldtimer
Where's the picture?Ok guys, Got my hood painted and all done. I will probably start putting everything back together on Monday. I do have a question? The interior looks pretty good other than on the driver side rocker panel, its kind of faded. I guess because of me going in and out of the truck. Not now but at a later date, I want to paint the inside of the truck. Should I sand the inside with 400 or is 600 good enough for the base coat. Just want to know for sure so I can use the correct grit before painting. Thanks to all.
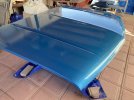
Here is the picture of the hood. I am getting reflections from around the patio where I have my hood right now. Its not perfect by any means but I can live with it. Have to get my truck back on the road. Will post another pix after I put everything back on it.