Man, what a learning process… I’m not sure I have enough years left to get good with laying down the paint, but maybe I’ll at least improve with the old Cougar next. I hope to get another garage space built by then so I’m not working in a portable tent and can get some decent lighting around me to be able to see the paint going on…
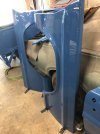
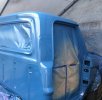
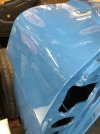
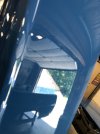
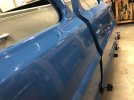
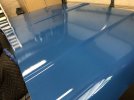
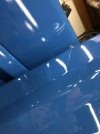
I sprayed the first 3 color coats of single-stage Motocryl back in May. Flattened all the orange peel and abundant dust nibs with 600 to a nice consistent surface and sprayed the final 3 coats this past week. On the plus side, I got a far cleaner spray each day as I worked through the various panels. I was careful to remember to wipe-off the hose between the coats, and hung the hood vertical instead of flat like before. I also sprayed the hood in a different session from the cab so I wasn’t stirring up as much dust moving back and forth, climbing around, and juggling step-stools, etc. Also did all my staging the night before along with blowing off and wiping down so the dust had more time to settle.
Orange-peel on the other hand unfortunately turned out worse than last time on some of the panels. I think the gun is probably adjusted correctly, and distance is correct, and I just need to slow down. I guess I’ve got a fear of getting a bunch of runs and sags and make the passes too fast. More experience or someone watching that actually knows what they are doing would I’m sure be able to make some fluid adjustments and suggestions to deal with the speed. I’m clueless, maybe the fluid control and/or pressure is still off. Lack of good lighting and really being able to see what’s happening doesn’t help….
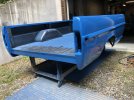
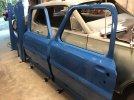
What I find odd is the difference I got from one morning to the next with the results. Four morning sessions, each at the same temps and humidity levels with best I could tell using the same settings, speed and distance. Fifty percent overlap. Looked the same going down but then would notice the texture after the final coat was down. The front fenders, doors and valence/ bumper guards on the first day came out the best. They looked slightly better than my results for the first 3 coats in May, with a light peel similar I guess to some factory jobs I’ve seen. The hood is the worst. It came out with much more texture. Maybe closer to a dry spray where it didn’t flow together as well. The bed is similar but not as bad. The cab finish is slightly better but not nearly as good as the doors and fenders.
Hard to see in the photos. It actually looks worse in the pics than it is, but still not good. Hopefully will be able to get it all looking nice after the next round of sanding and buffing. Guess I’ll start with 1000 and see how that seems to handle the texture. I may not have learned to spray but I have sure learned more of an appreciation for the skill and abilities of a painter…
I sprayed the first 3 color coats of single-stage Motocryl back in May. Flattened all the orange peel and abundant dust nibs with 600 to a nice consistent surface and sprayed the final 3 coats this past week. On the plus side, I got a far cleaner spray each day as I worked through the various panels. I was careful to remember to wipe-off the hose between the coats, and hung the hood vertical instead of flat like before. I also sprayed the hood in a different session from the cab so I wasn’t stirring up as much dust moving back and forth, climbing around, and juggling step-stools, etc. Also did all my staging the night before along with blowing off and wiping down so the dust had more time to settle.
Orange-peel on the other hand unfortunately turned out worse than last time on some of the panels. I think the gun is probably adjusted correctly, and distance is correct, and I just need to slow down. I guess I’ve got a fear of getting a bunch of runs and sags and make the passes too fast. More experience or someone watching that actually knows what they are doing would I’m sure be able to make some fluid adjustments and suggestions to deal with the speed. I’m clueless, maybe the fluid control and/or pressure is still off. Lack of good lighting and really being able to see what’s happening doesn’t help….
What I find odd is the difference I got from one morning to the next with the results. Four morning sessions, each at the same temps and humidity levels with best I could tell using the same settings, speed and distance. Fifty percent overlap. Looked the same going down but then would notice the texture after the final coat was down. The front fenders, doors and valence/ bumper guards on the first day came out the best. They looked slightly better than my results for the first 3 coats in May, with a light peel similar I guess to some factory jobs I’ve seen. The hood is the worst. It came out with much more texture. Maybe closer to a dry spray where it didn’t flow together as well. The bed is similar but not as bad. The cab finish is slightly better but not nearly as good as the doors and fenders.
Hard to see in the photos. It actually looks worse in the pics than it is, but still not good. Hopefully will be able to get it all looking nice after the next round of sanding and buffing. Guess I’ll start with 1000 and see how that seems to handle the texture. I may not have learned to spray but I have sure learned more of an appreciation for the skill and abilities of a painter…
Attachments
-
 79F0A46C-A1FD-4B45-9AEB-56C6BB412CB7.jpeg84.9 KB · Views: 138
 -
 587143A8-B2B0-419E-8F1F-8CD6DB9C8EC5.jpeg204.2 KB · Views: 131
 -
 6315CC54-3825-443F-94C5-CB4F12786E8D.jpeg148.9 KB · Views: 125
 -
 1A86D548-FFAB-481A-8CA7-20E1F002E6E4.jpeg126.7 KB · Views: 122
 -
 E9C43581-8025-4009-8AB4-84CF093C279E.jpeg157.4 KB · Views: 110
 -
 64BF691B-F9E4-4D8D-8B9B-C527A9AA4C92.jpeg133.7 KB · Views: 127
 -
 1C35E576-F265-4B8C-8323-F3F5AE1896FD.jpeg103.8 KB · Views: 119
 -
 73B1C02F-521E-49AC-8812-C4437B4963B8.jpeg90.7 KB · Views: 124
 -
 22BDBAB0-F32E-408B-BB33-A8FC7722070A.jpeg113 KB · Views: 126
 -
 8E2B6450-C094-42CE-BC8E-ADF8C96490D9.jpeg148.9 KB · Views: 109
Last edited:
") I know I don’t have the skills yet, and it is what it is.
I know I don’t have the skills yet, and it is what it is.