First painting attempt and thanks to the SPI Forum Members

Rick Shatswell

Promoted Users
Good evening,

After looking at this forum almost daily for the past year, I feel like I needed to register and post a big "thank you" for all the knowledge and tips I've compiled.
I completed several frame off restorations over the years, but always left the body work and paint work to my favorite body / restoration shop. I would strip the car disassemble and weld any needed sheet metal / rust repairs. At that point I would build some casters for the body and deliver to the professionals. The last one I did , the paint and bodywork was approaching $30K. It was exactly what I wanted and looked fantastic, but the fact is if I'm going tto keep playing with these old cars I need to also do the bodywork and paint in addition to the rest of the restoration.

So , I purchased a 1972 duster that was buried to the rockers for who knows how long. It was nearly free so I decided it would be a good first candidate to learn on.

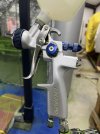
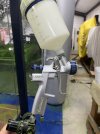
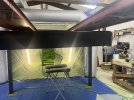
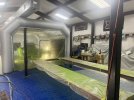
Watched a bunch of U tube to start the planning process and assembled required tools. Already familiar with the disassembly and rust repair. Media blasted the car and put in epoxy primer. I didn't know about SPI or the forum yet so got most of my stuff from Eastwood including a paint gun and an inflatable paint booth from amazon. I'm not one to skimp on tools, I just didn't know any better ;) . The good thing is I haven't used anything else so I don't know how good or bad they really are ;)

Somewhere along the line I stumbled on this forum it's been invaluable to me.

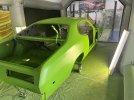
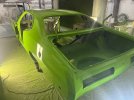
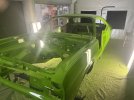
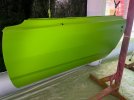
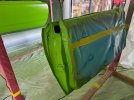
Ended up staying with the eastwood epoxy and primers just because i stated with it and didn't want to introduce something new. Went with the Motobase paint in Sassy Grass and the SPI universal clear.

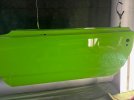
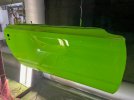
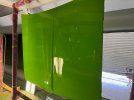
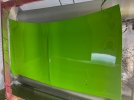
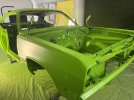
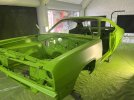
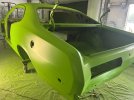
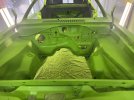
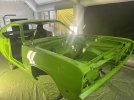
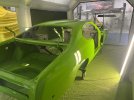
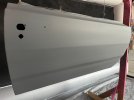
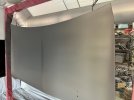
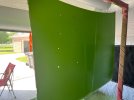
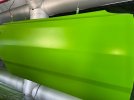
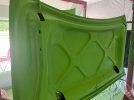
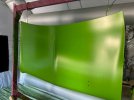
The whole care is blocked in 400. This week I got the hood, Trunk and both doors sealed, based and cleared.

I'm a real perfectionist and I definitely see some things I wish were better, but overall, it's hard to not be really happy with the progress and results given I never painted anything except rattle can stuff.
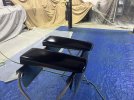
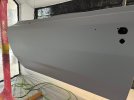
attached are some picts of the panels after sealing, then in base, then with the clear. The clear pictures are just after I turned off the fans per the instructions.

Not sure If it come out in the pictures, but I do have some little spots I think I dirt in the clear. I didn't notice them in the base, just after clear. I was afraid to touch it just yet but will see if I can feel them in the morning. Not enough lights in my booth for sure and old eyes don't help.

Next week I start spraying the body shell.......
 

Attachments

  • Sealed Door 2.jpg
    Sealed Door 2.jpg
    100 KB · Views: 197
  • Sealed door.jpg
    Sealed door.jpg
    91.1 KB · Views: 168
  • Sealed hood.jpg
    Sealed hood.jpg
    100.6 KB · Views: 134
  • Sealed trunk.jpg
    Sealed trunk.jpg
    107.3 KB · Views: 134
  • Door 2 base.jpg
    Door 2 base.jpg
    125.9 KB · Views: 129
  • Door back Base.jpg
    Door back Base.jpg
    144.5 KB · Views: 126
  • Hood Base.jpg
    Hood Base.jpg
    98.3 KB · Views: 132
  • Door base.jpg
    Door base.jpg
    72.7 KB · Views: 128
  • Trunk Back Base.jpg
    Trunk Back Base.jpg
    96.3 KB · Views: 133
  • Trunk Base.jpg
    Trunk Base.jpg
    105.5 KB · Views: 154
Now the clear pics.

Interested in feedback and thoughts on the specks if you can see them.

Some orange peel, but not terrible. I actually ran the sealer on the trunk so I had to wet sand and reseal. I bad waterfall for some reason, only on the trunk that I sprayed after the hood but before the doors. I think I was scared to get another run on the rest of the steps so maybe moving a little fast. On the 3rd coat I think was finally starting to see what you guys talk about atomizing on the overlap pass ;) Just winging it before that ;)

Many thanks again everyone for sharing all your knowledge!
 

Attachments

  • Door 2 clear.jpg
    Door 2 clear.jpg
    87 KB · Views: 152
  • Door Clear.jpg
    Door Clear.jpg
    104.2 KB · Views: 156
  • Hood clear.jpg
    Hood clear.jpg
    111.4 KB · Views: 151
  • Specks.jpg
    Specks.jpg
    49.2 KB · Views: 147
  • Trunk clear.jpg
    Trunk clear.jpg
    101.6 KB · Views: 174
Looking good. I’m in the same situation in the middle of my first paint job. Completed three coats of single stage last month and will be hitting all that with 600 and following up with the final two coats later this month.
Would have been making many more mistakes through the process if it were not for all the helpful knowledgeable folks on this forum.
 
Thanks. I woke up 3 times last night wanting to go out to the shop and check on it. Resisted the urge until 6 this morning ;)

I was happy with it when I went to bed, but I swear it healed and improved over the night. Almost no orange peel so I guess my spraying speed was at least acceptable. The little spots are just dirt nibs but even they look better. Maybe 3-4 per panel is what I see.

should I have taken everything out of the booth and cleaned after base and before clear?

many thanks again ;)
 
A quality tack cloth lightly dragged over the surface before clear removes any dust or dirt.
Not to say that you won't get more while clearing.

Since you are spraying it, all of those little specks will bother you however most everyone else will say, Wow, that looks fantastic.
 
Thanks. I woke up 3 times last night wanting to go out to the shop and check on it. Resisted the urge until 6 this morning ;)

I was happy with it when I went to bed, but I swear it healed and improved over the night. Almost no orange peel so I guess my spraying speed was at least acceptable. The little spots are just dirt nibs but even they look better. Maybe 3-4 per panel is what I see.

should I have taken everything out of the booth and cleaned after base and before clear?

many thanks again ;)
as it cures it will shrink up
 
Well, it started out well today with as I started on the body. Cleaned up the shop yesterday and lined up everything for an early start this morning. Put down my sealer coat and everything was going as planned..

I’m having to do some gymnastics to get this car how I want it. I’m painting the trunk, engine bay and complete underbelly body color. The car is on some homemade casters. So ……. I paint the top in the inflatable booth, then move the car onto a 4 post lift to paint the bottom side. Thought it would be best to spray the bottom in base before the top side. Got everything set up , loaded the gun with paint and checked my spray pattern on some paper taped to the wall. Spray pattern was complete garbage. Very heavy on both ends and very light in the middle. After lots of fiddling , took the gun completely apart 2-3 times cleaning and checking every hole in the thing. Checked air supply and even mixed another small batch of paint nothing helped. The fan knob does basically nothing. Pattern shrinks maybe an inch from max open to fully closed. it can no longer be adjusted to shoot a dot. Called Eastwood for some technical support and they say the gun is defective and will send me another in about a week…….I guess I cursed myself when I mentioned my Eastwood stuff earlier.

eastwood didn’t like the idea of me taking the fan adjuster apart for an inspection . The knob has screw to remove the knob and then it’s screwed into the gun housing but it’s very tight and i didn’t want to force it. I’m already screwed so what can I hurt at this point other than they want the old one back. Do I have any chance of fixing this one so I can continue? Anyone taken one apart before?

how long is my sealer good for before I have to scuff and reapply ?

thanks in advance for any advise
 
After dinner and a couple cold ones, went back out to look at this gun. It’s just not that complicated and I can’t accept “we will just send you another one” I’m not smart enough to quit when I should

started tracing down the air supply. Under the 1.3 nozzle there’s a plastic manifold of some sort. I was looking at a rebuild kit and it mentioned paying attention to an alignment pin when you pull and reinstall the plastic manifold. Interesting thing is you can see a whole where an alignment pin might go, but there is no alignment pin. I reinstalled it by trying to align the holes in the gun housing with what looked like the air flow path in the manifold. Now the dang thing works. Honestly , I don’t think it ever worked.. adjusting it min to max didn’t seen to affect it much, it was always pretty good. Now you can adjust it from really bad to a single dot. It’s not exactly a smooth steady adjustment.. it goes from nearly good to really bad quickly, but it can be adjusted. I’m a bit worried if it will stay where I put it. My theory is the manifold rotated slightly when I had the gun apart for cleaning since there is no alignment pin installed.

maybe I’m back in business for the time being anyway ……

reminder to self “This is why we don’t buy cheap tools”
I bet pics would be very helpful, of your gun and issue areas/parts of the gun
 
That’s a good idea
i‘ll try and take some next time I have it apart for cleaning. Here‘s an exploded view of the gun and manifold. The little hole in the 12 o’clock position is where I think the locating pin is suppose to be. Need to play with it some more , but I think the fan adjustment diverts the air between the 2 lower holes.
 

Attachments

  • IMG_2325.jpeg
    IMG_2325.jpeg
    160.1 KB · Views: 138
Attached are a couple of pictures of the Eastwood gun. It seems to function fine as long as the manifold is oriented correctly. It doesn’t seem to want to move when you take the gun apart and reassemble for cleaning .. continued on with the project today
 

Attachments

  • IMG_2332.jpeg
    IMG_2332.jpeg
    120.1 KB · Views: 107
  • IMG_2331.jpeg
    IMG_2331.jpeg
    114.8 KB · Views: 111
Got 3 coats of base on today underneath, trunk , engine bay and exterior body. So far so good

shooting the clear tomorrow!
 

Attachments

  • IMG_2326.jpeg
    IMG_2326.jpeg
    157.6 KB · Views: 101
  • IMG_2327.jpeg
    IMG_2327.jpeg
    154.1 KB · Views: 100
  • IMG_2328.jpeg
    IMG_2328.jpeg
    164.7 KB · Views: 101
  • IMG_2329.jpeg
    IMG_2329.jpeg
    143.6 KB · Views: 98
  • IMG_2330.jpeg
    IMG_2330.jpeg
    141.7 KB · Views: 127
Attached are a couple of pictures of the Eastwood gun. It seems to function fine as long as the manifold is oriented correctly. It doesn’t seem to want to move when you take the gun apart and reassemble for cleaning .. continued on with the project today
I am not familiar with the "manifold".... Does it have any pins or anything indicating that it can be installed only 1 way?Is it symmetrical?....Maybe some of the "pros" can chime in...Your base looks good...Clear is a very different animal to spray Practice as much as you can until you get your desired results(with clear)
 
I had never had the manifold off until I had the issue , but a tool was provided in the kit in case you need to remove it. The instructions warn you to take notice of the alignment pin for when you re install it. The thing is there is no alignment pin installed. I believe it should go in the hole in the 12 o’clock position. It looks like just a dead hole where a pin would fit. Seems to spray fine once I got the manifold rotated in the correct orientation. Eastwood is sending me a whole new kit so I’ll look at the new gun for an alignment pin once it arrives.

pretty happy with the base I have one spot I‘m a little concerned with. I was trying to dust some additional base behind the door hinges and pulled back to far while still on the trigger. Got a “heavy” spot on the edge of the finder. Not a run , but thicker and shiny compared to the rest. Hope it dulls down overnight

the underside and trunk were a pain and required lots of material. Not looking forward to clearing those ….

thanks for the feedback
 
Got four coats of clear down today with mostly good results.

Finished early enough to also get the scoops and wing painted hot rod black. Looks a bit glossy right now but hope it will flatten out overnight.

Problems, issues and lessons learned..

1) Had several issues with equipment
Gun fan issue described above - replacement gun arriving tomorrow
Booth lights need upgraded to LED. You have to rub on them and talk real nice to get them turned on in the morning
One of the booth fans just stopped and booth started to deflate. Disassembled and inspected, it started up and has been running 2 days now. Who knows.
I’m not real concerned with these items. Maybe these things don’t happen in a high dollar shop but they’re common around my place

2) Today on my first coat of clear on the top side I overfilled the gun and left a dribble across the roof. The bad thing is I’ve done this before, it was no big deal when shooting the primer. But I learned this one again and won’t be repeating this one. I got 4 good coats of clear so it should sand out. I’ll post a picture of the defect tomorrow

3) Almost no orange peel to mention and only 2 runs I’ve seen. Will get it outside tomorrow I hope for a better inspection. Managed to get two small runs, one in each door jam. I’m pretty clearly putting it on to heavy in the jams. The heavy spot I mentioned earlier in the post is barely noticeable after clear. You can see it if you know it’s there. I need to be more careful around the jams and hinges going forward.

4) came up with two spots that look like dirt smudges about the size of a dime in lower passenger quarter panel. I didn’t notice these at all before I started clearing or even when I was spraying. Unclear if it‘s in the clear or on the base. I tacked it off before clear so I think it’s in one of the clear coats. Maybe dirty air hose touched it. Hoping it sands out. I’ll post a picture of the defect tomorrow

5)My plan to base and clear the underbelly on the lift and move back and forth between the booth and the lift worked ok, but I think I stirred up trash than I would have liked. Don’t think I will use this method again.

Overall very happy with it and looking forward to see what I can fix with cut and buff
 

Attachments

  • IMG_2339.jpeg
    IMG_2339.jpeg
    169.5 KB · Views: 117
  • IMG_2333.jpeg
    IMG_2333.jpeg
    170.3 KB · Views: 125
  • IMG_2334.jpeg
    IMG_2334.jpeg
    150.7 KB · Views: 125
  • IMG_2335.jpeg
    IMG_2335.jpeg
    151 KB · Views: 121
  • IMG_2336.jpeg
    IMG_2336.jpeg
    152.5 KB · Views: 117
  • IMG_2337.jpeg
    IMG_2337.jpeg
    150.4 KB · Views: 120
  • IMG_2338.jpeg
    IMG_2338.jpeg
    199.4 KB · Views: 132
Back
Top