You are using an out of date browser. It may not display this or other websites correctly.
You should upgrade or use an alternative browser.
You should upgrade or use an alternative browser.
Metal help
- Thread starter texasking
- Start date
Robert's the Guru, but I've got a big mouth so this is my take.
I've had success with this method. Might take some trial and error but if you can access them from the backside push a low spot up, get the torch (small tip, neutral flame) and heat a small spot in the center of the low spot. Dull red is good enough. First couple I would try that and let it cool on its own. Might need to do it in several areas of the low spot. Also when you push it up , run your hand and see if you can feel a high. That would be the place to start.
If that doesn't shrink it enough heat a spot and tap with body hammer. If it's floppy you may have to support it with a dolly on the backside, but don't hit it hard enough to ring the dolly. I wouldn't artificially cool it (air or wet rag) as it will get harder to work that way. Go slow, don't get in a hurry....you know the drill.")
I've had success with this method. Might take some trial and error but if you can access them from the backside push a low spot up, get the torch (small tip, neutral flame) and heat a small spot in the center of the low spot. Dull red is good enough. First couple I would try that and let it cool on its own. Might need to do it in several areas of the low spot. Also when you push it up , run your hand and see if you can feel a high. That would be the place to start.
If that doesn't shrink it enough heat a spot and tap with body hammer. If it's floppy you may have to support it with a dolly on the backside, but don't hit it hard enough to ring the dolly. I wouldn't artificially cool it (air or wet rag) as it will get harder to work that way. Go slow, don't get in a hurry....you know the drill.
MP&C
Member
The reason I ask about the inner structure, is most of the time, damage such as this follows those openings exactly, and kinda verify that it was indeed sandblast damage. Someone is blasting along cleaning up the inside oblivious to the fact that nothing is hitting the panel underneath that brace, only at the opening. The peening action starts the stretch on the same side that the media hits, so it stretches INWARD toward the media source.
For heating methods, Robert kinda shys away from torches for sheet metal shrinking because I like the slower sneak up on the fix approach. Faster methods tend to have me sliding past the exit ramp sideways, and then I need to stretch again. So here is a media blasting damage "study" I did, and various methods to correct.
http://67-72chevytrucks.com/vboard/showthread.php?t=647269
My preferred method is using the heating tip on a dent puller, trunk lid upside-down so we have peaks upward, and then use the heating tip on the high(est) spot. By shrinking while the weight of the dent puller is against the panel (but don't push, you won't need excessive force) you can actually see the panel move down/outward as the shrink occurs. So in the same way that Chris is pushing a low outward and then heat, both are persuading the panel to move in the direction to remove the low even before heat is applied. But it boils down to using the "shrinking" tool you have, and what works best for you.
The panel really doesn't care which side heat is applied, it will shrink regardless. But in my experience, just having that little bit of force (weight) against the inside, it seemed to restore proper panel crown more quickly.
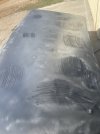
It is a trunk lid on a '67 Nova. All the lows are in the areas where the inner structure is not touching the outer skin. The problem with this particular trunk lid is there is very little access to the outer skin, only small holes. I worked on it this afternoon for a couple hours and got it 90% of where I want it to be by using the torch and working it very gently with low heat. I will see how it looks in the morning and try to get it a little closer without overshrinking. Right now it is sturdy and not trying to oil can, so I hope it is pretty close. I always read, with great interest, the posts about some of the fantastic metal work that is done on this forum. I am in no way even in the same league as some of you, but I have learned a lot and am getting pretty good at fixing these "blast" damaged panels, thanks to many on this forum.Agree with Chris…
1. Is this a trunk lid
2. Do the "low spots" match up to holes in the inner structure on the back side..
U
Undisputed
That sounds impressive! And I think that it is good that you used low heat. Anything high and you could have caused damageIt is a trunk lid on a '67 Nova. All the lows are in the areas where the inner structure is not touching the outer skin. The problem with this particular trunk lid is there is very little access to the outer skin, only small holes. I worked on it this afternoon for a couple hours and got it 90% of where I want it to be by using the torch and working it very gently with low heat. I will see how it looks in the morning and try to get it a little closer without overshrinking. Right now it is sturdy and not trying to oil can, so I hope it is pretty close. I always read, with great interest, the posts about some of the fantastic metal work that is done on this forum. I am in no way even in the same league as some of you, but I have learned a lot and am getting pretty good at fixing these "blast" damaged panels, thanks to many on this forum.
RosharonRooster
Promoted Users
I had a rust free 64 trunk underside sand blasted and when I got it back..all then areas where there wasn't inner structure were low spots like you are describing. I dont know how to shrink metal so I bought a reproduction trunk....surprisingly it fit really good. The blaster ruined my hood and trunk...Agree with Chris…
1. Is this a trunk lid
2. Do the "low spots" match up to holes in the inner structure on the back side..
I had parts blasted by the same local blasting company for years without issues, then I had a 66 Charger blasted and they pretty much ruined the whole car, including a rust free trunk lid, which is very hard to find. After that I had 3 trucks done by 3 separate dustless blasters that did the same thing, each one guaranteeing they never had any problems with warping Needless to say, I have given up on anyone around here touching another one of my customers vehicles. Spending an extra 40 hours or hundreds of dollars gets old. The only positive is the experience I have gained from repairing much of this damage. All of the advice I have gotten on here has been spot on from the "real" metal men. @RosharonRooster, take that deck lid and a torch with a small tip and practice on it. You might surprise yourself!
Needless to say, I have given up on anyone around here touching another one of my customers vehicles. Spending an extra 40 hours or hundreds of dollars gets old. The only positive is the experience I have gained from repairing much of this damage. All of the advice I have gotten on here has been spot on from the "real" metal men. @RosharonRooster, take that deck lid and a torch with a small tip and practice on it. You might surprise yourself!RosharonRooster
Promoted Users
I sold that trunk to a friend for 50 bucks (repop trunk is 400) because he wanted to try and experiment with it. Maybe ill buy it back. I had a floor board sand blasted on a rotisserie by a mobile dustless blaster....it was my first time paying for that...it wasn't exactly dustless....left with a big wet gritty mess under the car. ..the next one I had done I pushed the car on the rotisserie down the street and had him do it there lol. Cant get away with that in the city lolI had parts blasted by the same local blasting company for years without issues, then I had a 66 Charger blasted and they pretty much ruined the whole car, including a rust free trunk lid, which is very hard to find. After that I had 3 trucks done by 3 separate dustless blasters that did the same thing, each one guaranteeing they never had any problems with warping
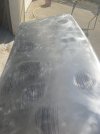
The process I ended up using on the Nova trunk lid worked out great. I used a OA torch with a small tip and circled the perimeter of the low spot working towards the center. I just let it cool naturally while moving to a different low area and repeating the process. I never got the metal glowing red, just a very dull red in the center of the lows. After doing this to all the lows, they all got smaller in diameter and shallower, and I just repeated the process until they were very close to flat, then let it sit overnight. The next morning there were a few spots that needed more shrinking and I used the torch again until it felt pretty good. After epoxy, I spread a coat of filler over the whole trunk, guide coated, and blocked with a 30" block with 80#. One more coat of filler and everything came out. Two more coats of epoxy, let it sit over the weekend, then sprayed 3 coats of G2 Featherfill. A few days later it was guide coated, blocked with 80#, guide coated, blocked with 150#, guide coated and blocked with 180# before applying 2 more coats of black epoxy. Considering what I started with, and very little access to the backside, I am very happy with how it looks now. You can't go wrong with the advice from Robert, Chris, John Long, John Glenn and others on this forum.