Hello all;
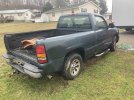
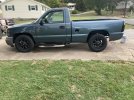
So been lurking on the forum for six months or so but this is my first post. I have a 2007 GMC sierra classic I’m repairing for my sons first vehicle. I found SPI while researching how to get the frame rust dealt with and coated that with epoxy primer. Really liked it and want to buy more to cover some repair areas before bc/cc. I have one area though that’s giving me some trouble. It’s the upper part of the drivers side bed. There was some rust through the panel right in between the two body lines. So without going through everything I thought/tried, I made a patch panel. Only problem is I couldn’t duplicate the rolled body lines and the low crown that ran in the opposite axis I guess you’d say. This means in the middle of the patch there’s a low area that will need maybe 1/16” of filler. Since I don’t have epoxy atm and the truck sits outside I needed to waterproof it somehow. I had a cartridge of SEM panel bond adhesive that was half used up so I spread some on cardboard hand mixed and applied with a spreader (saved using one of those expensive tips). I mainly used this because a) I had it and no other use for it in near future so it prob woulda gone bad before I needed it again and b) I didn’t have anything else available except spray can primer, specifically a self etching which I thought would maybe cause problems with the epoxy later even sanded due to not knowing what was in the rattle can. My original plan was to sand the adhesive back off using 80 grit then epoxy when the time came. But with needing that fill I started wondering if it would be acceptable to sand it with 180g, epoxy over it, then filler, then epoxy, then bc/cc. I did a wheel well same way but it doesn’t need filler so I’m sure it’ll end up at bare metal when I prep it for primer. Now the second part, I guess once the hole rusted in it let water run down the inside of the panel and there’s a long “line” inside that’s not rusted all the way through but is thin, real thin. Fixing it would basically require a cut down the whole length of the bed. Essentially cutting the bed in two. With the low crown especially I’m thinking of leaving it but going in on the backside to clean and coat, prob with epoxy primer, to prevent further corrosion. The only problem is that being so thin caused an issue with welding the patch. I saw it coming and came off the edge a bit and built up a little with weld as a “dam” to prevent chasing it down the panel. That worked in that when I hit that area it did blow through (even had the welder turned down all the way) but stopped at the previously mentioned surface weld. But it caused a warp right there. If I can get to the back side is there a way I can planish this out at this point? If not would it be worth it to try and fill? Or should I just live with what will probably look like a dent after painting? Again this truck sat for like ten years and doesn’t need to be perfect. Main goal is to fix rust issues and dress up as best I can but it’ll have a sixteen year old driver so….may be scrap in a few months anyway. If not it will stay in family as it has sentimental value to my wife. So any advice would be appreciated. Thanks!
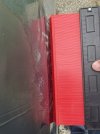
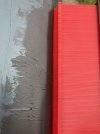
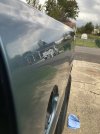
This is of the patch showing the filler that will be needed….

This shows the warped spot which is at bottom of and extends below the patch

The warped are is under my fingers in this pic

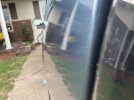
Next two pics are of the bed inside showing the weld area. Where you see the “mig nest” is where it was thin. Thinking now I should have tried to come down a little further but, also not sure I could have made a patch panel that large with that crown with my experience/tools.


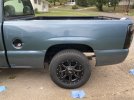
Last pic is just an overall of the repair without my hand in the way.


Obviously nothing has been sanded down yet. As I said need to order more epoxy. Prob won’t sand until I’m ready to spray. That patch panel wasn’t rusted when I put it in but already looks flashed. Again since I have limited acces(it’s tighter than it looks in pic) I was planning to coat as best as possible then keep spray yearly with either ospho or wd40. Thanks again for any advice.
So been lurking on the forum for six months or so but this is my first post. I have a 2007 GMC sierra classic I’m repairing for my sons first vehicle. I found SPI while researching how to get the frame rust dealt with and coated that with epoxy primer. Really liked it and want to buy more to cover some repair areas before bc/cc. I have one area though that’s giving me some trouble. It’s the upper part of the drivers side bed. There was some rust through the panel right in between the two body lines. So without going through everything I thought/tried, I made a patch panel. Only problem is I couldn’t duplicate the rolled body lines and the low crown that ran in the opposite axis I guess you’d say. This means in the middle of the patch there’s a low area that will need maybe 1/16” of filler. Since I don’t have epoxy atm and the truck sits outside I needed to waterproof it somehow. I had a cartridge of SEM panel bond adhesive that was half used up so I spread some on cardboard hand mixed and applied with a spreader (saved using one of those expensive tips). I mainly used this because a) I had it and no other use for it in near future so it prob woulda gone bad before I needed it again and b) I didn’t have anything else available except spray can primer, specifically a self etching which I thought would maybe cause problems with the epoxy later even sanded due to not knowing what was in the rattle can. My original plan was to sand the adhesive back off using 80 grit then epoxy when the time came. But with needing that fill I started wondering if it would be acceptable to sand it with 180g, epoxy over it, then filler, then epoxy, then bc/cc. I did a wheel well same way but it doesn’t need filler so I’m sure it’ll end up at bare metal when I prep it for primer. Now the second part, I guess once the hole rusted in it let water run down the inside of the panel and there’s a long “line” inside that’s not rusted all the way through but is thin, real thin. Fixing it would basically require a cut down the whole length of the bed. Essentially cutting the bed in two. With the low crown especially I’m thinking of leaving it but going in on the backside to clean and coat, prob with epoxy primer, to prevent further corrosion. The only problem is that being so thin caused an issue with welding the patch. I saw it coming and came off the edge a bit and built up a little with weld as a “dam” to prevent chasing it down the panel. That worked in that when I hit that area it did blow through (even had the welder turned down all the way) but stopped at the previously mentioned surface weld. But it caused a warp right there. If I can get to the back side is there a way I can planish this out at this point? If not would it be worth it to try and fill? Or should I just live with what will probably look like a dent after painting? Again this truck sat for like ten years and doesn’t need to be perfect. Main goal is to fix rust issues and dress up as best I can but it’ll have a sixteen year old driver so….may be scrap in a few months anyway. If not it will stay in family as it has sentimental value to my wife. So any advice would be appreciated. Thanks!
This is of the patch showing the filler that will be needed….
This shows the warped spot which is at bottom of and extends below the patch
The warped are is under my fingers in this pic
Next two pics are of the bed inside showing the weld area. Where you see the “mig nest” is where it was thin. Thinking now I should have tried to come down a little further but, also not sure I could have made a patch panel that large with that crown with my experience/tools.
Last pic is just an overall of the repair without my hand in the way.
Obviously nothing has been sanded down yet. As I said need to order more epoxy. Prob won’t sand until I’m ready to spray. That patch panel wasn’t rusted when I put it in but already looks flashed. Again since I have limited acces(it’s tighter than it looks in pic) I was planning to coat as best as possible then keep spray yearly with either ospho or wd40. Thanks again for any advice.