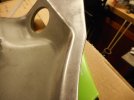
Patch sunk after welding

Yotabldr

Promoted Users
Seems awhile back I stumbled on a post addressing this problem, o/c now that I need it it's MIA.

.035 material, 28 amps using tig, tacked about every 3/8" or so. I think 28 was a little too hot, judging how flat the welds were.
Wrapped the ends first with two short "U" shaped passes, then 3 or 4 short stitches on each run down the sides.
All tacked in, everything was nice and flush.
After welding, entire patch was about 5 to 10 thou low from the end surfaces.
Couldn't planish tacks or weld like I'd liked to given the "C" channel shape on the backside.
Sorry didn't get any shots immediately after welding...too anxious to fix the issue.
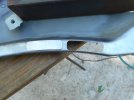
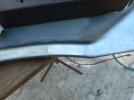
DSCN1355.JPG DSCN1354.JPG DSCN1356.JPG


Able to get it hammered back out and finished ok I guess, just wondering if this is normal or do I need to change my recipe and/or tack something like this in a little proud next time to compensate.
I'm thinking the angled sides had something to do with this problem.
Got another patch to do just like this in the next few days and hoping to counter it.
 
Yes, normal. You can control 2 out of the three dimensions in welding but not the third. Liquid to solidus--then 2 solid state phase changes to ambient temperature all contribute to shrinkage with filler metal added or not. It has no where to shrink and keep things together (i.e. not crack) except in the unrestrained thickness dimension. Just remember with any welding--at the end of doing it--something is left in residual compression and countered by residual tension somewhere. Best not to sequence as you did--work from a fixed point to free with welding.
 
So would that mean starting at "X" o'clock, wrapping around in one direction and finishing at same point?
No, that means looking at your patch and seeing where it is apt to be most rigid first and start there and end my pass somewhere more apt to give on cooling. Balance your welding by picking points of symmetry to begin and end. If it were me, I would start welding mid straight length on the outside bottom and end my first weld midpoint on the short distance on the right side. Balance that with the next weld starting top straight length midpoint and welding around to finish where you stopped on the first deposit. Then you have half of it locked in. Repeat for other side of patch. I rarely tack my second side--I use a "bridge bar" piece of sheet steel on edge instead with one tack on the patch--one on each side of the weld joint.
 
There’s a lot of good input
My experience has been…leave something critical 0.030 “proud”
That’s on 100% joint penetration.
You can not defeat shrink.
Back step, counter draw ,continuous pass it all shrinks…
If your within that know shrinkage (carbon steel ) …..your better than I have experienced.
 
What isn't being said here is that when welding sheet with TIG or gas welding you can stretch the HAZ and take out any shrinkage you may get. MIG not as much but you can stretch some. Trying to weld sheet with no shrinkage aint gonna happen, although I have seen continuous (one side to the other no stopping) TIG welded seams on sheet, on something with a little crown with no shrinkage and no planishing either. I'm not good enough for that though.

It's all about the HAZ. AN even HAZ and you have less warping. Skipping around actually sometimes will cause more shrinkage than continuous welding. Irregardless you should plan your patches so that you have access to the back and plan to stretch the HAZ to remove any shrinkage that may occur.

Often, patching the smallest possible piece/area is not the best plan. Like trying to replace the bottom of a door skin on a long flat door. You will get a lot of shrinkage. Often easier to make a patch larger and weld in higher crown area. And never try to weld in an area with a reverse curve. Extend your patch out past the reverse.

OP. the finished piece looks outstanding BTW.
 
Last edited:
Thanks to all for the responses and kind words. Lots of good info here.

Gotta admit I wasn't crazy about slugging it out the way I did. Almost went with a patch much like the way a shark takes a bite out of a surfboard, but a previous patch on the same panel went super smooth a gave me a little too much confidence, IDK. Don't get me wrong, I'm satisfied with the result, just looking to make the journey to get there easier.

Have always had a hard time predicting weld shrinkage, especially on sheet metal.

Thanks again guys.
 
although I have seen continuous (one side to the other no stopping) TIG welded seams on sheet, on something with a little crown with no shrinkage and no planishing either.
That was done on a door. It requires a tig, moving along at a rapid pace, just fusion welding---no time for filler rod. I couldn't do it either.
 
Do you guys intentionally not use Pulsed TIG? I can’t remember the last time I turned pulse off for sheet metal. I‘ve spent so much time welding 20ga the past year that 16 feels like plate to me. I can’t imagine not having pulse and throwing all that heat into the repair.
 
Do you guys intentionally not use Pulsed TIG? I can’t remember the last time I turned pulse off for sheet metal. I‘ve spent so much time welding 20ga the past year that 16 feels like plate to me. I can’t imagine not having pulse and throwing all that heat into the repair.

Got the pulse feature but haven't found a setting I'm happy with.

What kind of settings you running on 20g?
 
Given your welds shrink, especially along the long dimension, the top (outward part of the dogleg where your patch is located) is going to shrink or pull together in length. As the adjacent part of the dogleg (the open edge of the flange to one side and jamb on the other) are farther from the heat and less prone to shrinking effects, they tend to hold the original shape. This causes the dogleg to push inwards (drop down) as the outer face shrinks. The cure is to be able to planish your welds using hammer and dolly to add stretch and counter the shrinking effects. A corner is more challenging to planish, a seam brought in slightly into the flat area would make the welds more accessible for planishing, if the rust area is small enough to allow it.
 
Got the pulse feature but haven't found a setting I'm happy with.

What kind of settings you running on 20g?
My settings are “unconventional” to say the least, but give me what I’m looking for on the front as well as the back of the panel. I’d definitely experiment on scrap in your free time.

For 20ga I’m usually between 110-120A, 1.2 pulses/sec, 10% pulse duty, and 10% pulse background. For example @ 120A, I’d only be “on” or @ 120A for 1/10th of the total pulse duration, the rest of the pulse time I’m at 10% or 12A waiting for the next pulse to happen. I run a simple on/off button because it’s easy for out of position and I don’t want any ramps up/down anyways.

Again, far from conventional settings, but I’ve seen a few people weld this way. For me it started as just a way to mitigate heat in areas I couldn’t get access to the back of the panel. It just became comfortable all around for me after that.

That 110-120 range is basically dependent upon my gap. Although I strive for the tightest patch panel fit, I’m always swapping my filler between 0.045, 0.035, 0.030, and 0.023. All of those I can get as standard TIG filler rod except the 0.023. I get them in ER70S-2, and the 0.023 is my MIG wire which I run ER70S-7. Anywhere from 0.023 on a perfect fit, to 0.045 on somewhere I screwed up and see a sliver of “daylight”.

Again, not saying to use what crazy settings I’m happy with, but it is fun to experiment with those settings if you have them available to you. If you normally weld at 30A you can try a pulse duty of 50% and a background of 50, then set your pulse set your number of pulses/sec to whatever you’re comfortable with. The pulse itself can become somewhat of a “cadence” for your step/dab. You still get your 30A when you are ready to dab, but right after that you drop to 15A as you’re moving forward to setup for your next dab. With the 50% and 50% settings you’re eliminating 1/2 the heat input, half of the time. Of course running extreme settings on thick material would just give you a constant puddle freeze between every pulse, but with the way the thin sheet retains heat, you have more options.
Dang I wasn't making this complicated enough, How many different sizes of wire do I need to weld sheet metal?
 
Dang I wasn't making this complicated enough, How many different sizes of wire do I need to weld sheet metal?
My apologies… I wasn’t trying to make my reply a how-to, quite the opposite. Lol

I just really enjoy getting people to think outside the box. We all don’t have the same machines, the same eyesight, the same steadiness of hand, filler materials, projects, or any of that. I was always a strict “follow the directions” and “mathematical equations” type person. I suffered trying to weld according to everybody’s directions and make myself “fit” the mold to get the results I wanted. I got stressed, frustrated, and just believed myself to be bad at welding.

Fast forward to me eventually watching some videos of people welding in some very not-ordinary ways and then I felt free. I’m fortunate that my supplier sells me 5x10 sheets of 20ga for $45. I ripped those sheets down into as many thin strips as I could (to purposely fight heat) and welded them back up. I tried some really stupid stuff but learned what worked FOR ME!

Oh yeah, I also wouldn’t expect anybody else to have all that filler on hand. I do that because I’m lazy in a way. Like I said, I don’t run a pedal or even a rotary control anymore. I purposely use a finger on/off switch and my welder is quite a ways away from me. Instead of getting up every 2 min to trim or add 5A, it’s easier to just add or subtract minute amounts of metal (filler) and run the same amps. Sorry to steer this post away from what it was… I was just legitimately curious about people using/not using pulse. Thanks!
 
Back
Top