polishing

shine

Member
i have had several emails lately and seen threads on various sites on buffing. this is my take on it.

most new painters or diy guys seem to make the following mistakes.

not sanding enough with each grit
trying to skip grits
letting the pad get dry or loaded up
using too high of a speed
biggest thing i saw was never cleaning the pad

one thing seldom brought up is you can burn paint with the buffer. i dont mean a burn through . you can overheat the paint and kill the gloss. it will be slick but will not have the high gloss your looking for. and once burnt it will not polish back up. it will have a slight dull look like clear rubber. so be careful and take your time. check your surface and be sure your not getting it too hot. foam pads create heat. staying on one spot too long will really get it hot.

just food for thought and worth just what you paid ................. :encouragement:
 
All good information Shine.

I also have seen friends buff through the edges of panels because they did not run the pad "off" the panel instead of on to it. Sometimes it is even a good idea to put a piece of tape on the adjacent panel to protect it from the pad running on to it.

Glad to see this thread. It could help a lot of guys who are just getting into the buffing part of their projects.

I read most all of the threads on cutting and buffing. There are lots of good tips out there as well as feedback on the latest and greatest materials. Are you still liking the new products from the Chemical Guys?

John
 
so far i love it. i need to do some black for comparison but it seems to give a wet look . smells good too !

i use so much painters blue tape when i buff it looks like i'm building a nest ! i keep the 2 in handy to protect sides when buffing in a valley .
 
Seems like the compound I use these days has to be washed off the pad, where the old stuff would spur/blow out fairly easily. Each side of a double sided pad will do about 2 medium sized panels, but then the pad MUST be washed out...
 
Crashtech, do mind explaining your preferred washing method with the pads?

I'm just starting to collect what I need to have a go at doing it myself. Threads like this from people with vast experience like the members here help so much.

Last week I received one of the Chemical guys Flex kits and purchased some Menzerna polishes. I saw the link Shine posted to the Chemical guys site recommending the Flex. But being a beginner I went with the orbital and not the rotary.

 
Well most of the time I just hold them up against the painted block wall in my wash bay and spray them with the hose. There are special 5 gal bucket adapters made for pad washing, but I don't do as much buffing as a lot of guys here. One place I worked had a double sink on the shop floor and you could just soak them and rinse them. To me there is no wrong way as long as the rinse involves lots of clean water.

I spin them dry on the buffer.
 
Cheers for that :encouragement: That is easier than I expected. Easy done, thank you!
 
i keep my pad clean . i rinse it after every third application of compound. i keep a squirt bottle handy for this. you can also use a sanding bucket . any build up just stops the cutting action. took me a long time to change ways. in the old days you would build the compound into the pad . the new vseries from chemical guys performs much better using the least amount .
 
I made my pad cleaning bucket out of a 5 gal plastic paint bucket. I took the lid and cut a slot in it about 1" wide and to the center of the lid. I fill the bucket about half full of water w/ a few drops of dawn in it. I take the pad off the buffer, wash it in the water, then rinse it out with the water hose. Final step is slide the lid over the shaft on the buffer with the pad installed. Set lid on pail, spin pad with buffer. bucket catches all the sling off and keeps things a bit tidier.
 
Senile Old Fart;32806 said:
I made my pad cleaning bucket out of a 5 gal plastic paint bucket. I took the lid and cut a slot in it about 1" wide and to the center of the lid. I fill the bucket about half full of water w/ a few drops of dawn in it. I take the pad off the buffer, wash it in the water, then rinse it out with the water hose. Final step is slide the lid over the shaft on the buffer with the pad installed. Set lid on pail, spin pad with buffer. bucket catches all the sling off and keeps things a bit tidier.

That's a neat idea, thanks.
 
All that water flying off the buffer can get stuff wet if you are not careful! I squeeze the pads out a bit by hand before spinning them, and trigger the machine at low speed... But the bucket is a VERY cool idea!
 
Senile Old Fart;32806 said:
I made my pad cleaning bucket out of a 5 gal plastic paint bucket. I took the lid and cut a slot in it about 1" wide and to the center of the lid. I fill the bucket about half full of water w/ a few drops of dawn in it. I take the pad off the buffer, wash it in the water, then rinse it out with the water hose. Final step is slide the lid over the shaft on the buffer with the pad installed. Set lid on pail, spin pad with buffer. bucket catches all the sling off and keeps things a bit tidier.
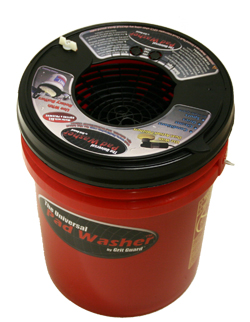
I have quite a few 5-gallon buckets (came with pool chlorine tablets) and was planning to make one just like yours. I was surprised Snap-On doesn't make one but all is not lost -- Grit Guard makes one for only $135 (plus shipping and handling). Tempting as it is, I'm going to go with your "free" design.
Universal-Pad-Washer-Alone.jpg
 
i polish in the same area , never used a bucket , never had a problem . common sense should tell you to get most of the water out before you spin it. if not you will figure it out real quick .

but larry's idea beats hell out of a 135 dollar bucket ! those gritguard folks are just friggin nuts .
 
shine;32963 said:
... those gritguard folks are just friggin nuts .
Chemical Guys aren't far behind. Much as I like many of their products, one 8 oz. can of their Project J97 White Carnauba Paste Wax is $849.99. That's more than the total I paid for my first five cars (55 Plymouth Belvedere, 56 Ford Victoria, 55 Chevy Belair hardtop, 56 Chevy 210 and 47 Ford sedan) back in the early '60s. Also more than I paid for four 17" polished aluminum rims just last year....

Apparently the wax is good but the "can" it comes in makes it worth all that money:

``````````````````````````````From the website`````````````````````````
The Container
If we were going to set out to make the best wax that money could buy, we certainly weren’t going to just put it in a plastic jar (that’s not our style). We set out to make something revolutionary. Another CG friend who is a designer and professional motorcycle racer brought the concept of fashioning the jar to resemble a motorcycle clutch box cover. The design, which was modeled after the cover on his favorite race bike, is a symmetrical design, designed perfectly to house the detailers fingers, anchoring a firm grip on the jar. The face of the jar features numerous lines, machined out of a solid aluminum block, symbolizing the many roads of life. The polished Chemical Guys skull logo grinning on the front gives way to the lifestyle that is Chemical Guys, much like the worldwide family of Chemical Guys detailers around the world, Project J97 is fueled by passion. The front also houses four aircraft bolts that need to be unscrewed to unlock the airtight Project J97 canister. This mechanism will keep your product safe, air tight and contamination free for as long as you own the product. The container itself, which has been nominated for several industrial design awards, is a work of art…much like the vehicles the product is used on.

n_002banner6.jpg
 
i use mothers carnuba wax. believe it or not there are people who buy this kind of stuff. but they are using it on car collections worth several million dollars. to me it's ego . but a plastic bucket for 135 is nuts. but then i stopped using a bucket to sand with around 30 years ago . 3m use to sell the little tray for buckets years ago .
 
There is a little more to the "bucket", there is a manual pump system inside that pumps the cleaning solution into your pad as you depress it.You then run your pad against the
"grit quard" type pad cleaner inside the bucket and it does a great job of cleaning pads,either wool or foam, all within the bucket. You can spin the pad within the lid of the bucket and keep things fairly dry.

- - - Updated - - -

There is a little more to the "bucket", there is a manual pump system inside that pumps the cleaning solution into your pad as you depress it.You then run your pad against the
"grit quard" type pad cleaner inside the bucket and it does a great job of cleaning pads,either wool or foam, all within the bucket. You can spin the pad within the lid of the bucket and keep things fairly dry.
 
Lariat is right, it isn't just a plastic bucket with a hole cut in the lid. You can also find them cheaper online through 3rd party distributors. It may sound nuts but if you can find one for 100 bucks and you are doing a fair amount of buffing then why not if you can justify the cost? Sure the same job can be done without it....but the same could be said with many of those specialty tools we have in our box.

I am to the point where I am buffing at least 1-2-3 times a week, every week. That's just how busy we are. The name of the game is increasing production. $100-$150 seems pretty cheap if it will increase your production on a weekly or daily basis. That is, obviously, if it works like the video shows.

Of course, production doesn't really have anything to do if you are in your garage doing your own thing. But just something to think about.... :encouragement:

- - - Updated - - -

shine;32972 said:
i use my hands to clean my foam pads. cant see them lasting long running against anything.

That is a good point, especially with some of the softer foam pads.
 
Back
Top