Porsche 911 backdate project

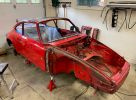
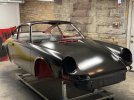
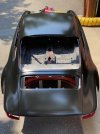
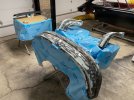
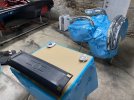
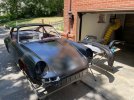
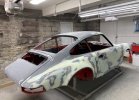
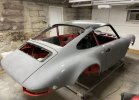
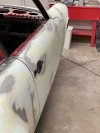
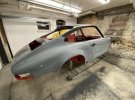
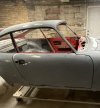
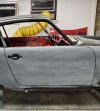
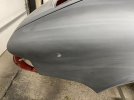
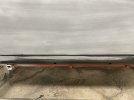
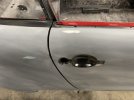
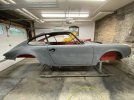
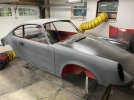
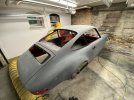
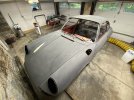
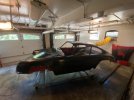
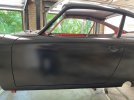
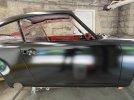
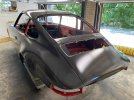
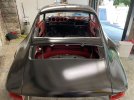
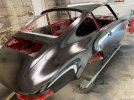
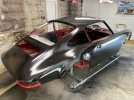
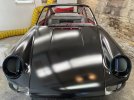
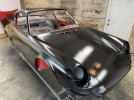
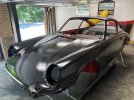
A few more photos with the masking off. Really liking this epoxy primer. Planning to paint all the red stuff with 3 coats of epoxy too after a few undercoating touch ups. Can’t wait to have the car all one color again.
 

Attachments

  • C7E2034F-E842-486C-AD21-FD39B377035C.jpeg
    C7E2034F-E842-486C-AD21-FD39B377035C.jpeg
    117.5 KB · Views: 162
  • E0CF584D-E795-4F0E-B88A-77AEAF246725.jpeg
    E0CF584D-E795-4F0E-B88A-77AEAF246725.jpeg
    148.8 KB · Views: 130
  • FB982BDC-BF63-4C38-A146-4082D9BB699A.jpeg
    FB982BDC-BF63-4C38-A146-4082D9BB699A.jpeg
    197 KB · Views: 125
  • 6579026A-A3C3-4A35-92E6-5F89E59D0ECC.jpeg
    6579026A-A3C3-4A35-92E6-5F89E59D0ECC.jpeg
    191.1 KB · Views: 126
  • 66ABB968-0EA1-42EB-8A7C-2AF59E5A93DF.jpeg
    66ABB968-0EA1-42EB-8A7C-2AF59E5A93DF.jpeg
    177 KB · Views: 124
  • E7104804-D10A-46C3-9B4F-C3219A35254E.jpeg
    E7104804-D10A-46C3-9B4F-C3219A35254E.jpeg
    203.6 KB · Views: 113
  • A5042528-D307-48FC-A0E4-490C658AA6E4.jpeg
    A5042528-D307-48FC-A0E4-490C658AA6E4.jpeg
    218.9 KB · Views: 125
  • 702ED305-07E4-4485-9BC8-94E598332E12.jpeg
    702ED305-07E4-4485-9BC8-94E598332E12.jpeg
    180.5 KB · Views: 107
  • 2F6C311B-D5F2-4D0E-93F0-A341C415965A.jpeg
    2F6C311B-D5F2-4D0E-93F0-A341C415965A.jpeg
    200.4 KB · Views: 115
  • 712624FF-7F82-4BF1-B3A6-0957145984B6.jpeg
    712624FF-7F82-4BF1-B3A6-0957145984B6.jpeg
    175.8 KB · Views: 127
Planning to go from the original red Carrera frame I bought, to the current ‘73RS backdate in black epoxy primer, eventually to Aubergine Glasurit paint like this one. Getting there slowly. Metalwork and bodywork is finally nearing completion.
 

Attachments

  • 6EAB31C7-21A1-424C-942F-42F0EBC73737.png
    6EAB31C7-21A1-424C-942F-42F0EBC73737.png
    1.5 MB · Views: 116
  • FAA067C9-DC28-4582-BCDF-BE169B293C4A.jpeg
    FAA067C9-DC28-4582-BCDF-BE169B293C4A.jpeg
    185.1 KB · Views: 118
  • 061EA226-C297-4A97-BC2E-7E21B3592650.png
    061EA226-C297-4A97-BC2E-7E21B3592650.png
    1.2 MB · Views: 124
It was 90 degrees here today with clear skies and a super bright sun. I left the car outside in the sun for a good 5 hours. It smelled a little liked burnt electrical tape. The epoxy seems like it cured a bit more from the heat. Planning to do the same over the next few days with 90+ temps, low humidity and bright sunshine. Also I got the bumpers and other bits all ready to go for a morning spray. Planning 4 wet coats again. I’m getting a method down for doing this work.
 

Attachments

  • 02EEEDB4-3335-4056-8478-9E853BF2CCB0.jpeg
    02EEEDB4-3335-4056-8478-9E853BF2CCB0.jpeg
    186.9 KB · Views: 120
  • 866D448F-CB43-4384-B2F7-8561AFB41E16.jpeg
    866D448F-CB43-4384-B2F7-8561AFB41E16.jpeg
    198 KB · Views: 118
  • C5B2E0ED-46F3-42C0-88CB-9B2CD759E671.jpeg
    C5B2E0ED-46F3-42C0-88CB-9B2CD759E671.jpeg
    178.7 KB · Views: 125
I should mention that I picked up a new PPE tool. It’s a turbine fresh air pump and hood from Breathe Cool. Works great! I’m ultra cautious so I also wear a 3M half mask with new filters each spray day under the fresh air hood. I’m covered from head to toe with this setup and a fresh pair of coveralls. It lets me feel comfortable taking my time in the spray room. It’s totally worth the $500 for the kit and I could probably sell it after the project for $300-$350. Not much investment for the piece of mind that it brings.
 
Another day in the sun. Smells like burnt electrical tape again. Supposed to be 97 degrees today and it’s dry and windy outside. On the bumper parts I made the same mistake I did last time on the body and put the first coat on too heavy. It got lumpy in a few areas. I’ve learned the hard way at to make sure the first coat is light. Then pile more on with subsequent coats. Next time won’t make this error again.
 

Attachments

  • 5D47238B-89B6-47C7-B797-8F3CE2E9A98B.jpeg
    5D47238B-89B6-47C7-B797-8F3CE2E9A98B.jpeg
    227.5 KB · Views: 108
It's pretty incredible to me how thick you are able to apply the epoxy. From the photos, it has a texture more reminiscent of polyester primer than the semi-gloss paint-like finish that I am used to seeing with conventional spray equipment. I am wondering if the lingering smell is due to solvent trapping in the thick layers of material.
 
It's pretty incredible to me how thick you are able to apply the epoxy. From the photos, it has a texture more reminiscent of polyester primer than the semi-gloss paint-like finish that I am used to seeing with conventional spray equipment. I am wondering if the lingering smell is due to solvent trapping in the thick layers of material.
Smells more like welding residue from shaving the roof gutters (which burned off the old adhesive inside).

Just checked and my metal temps are about 140 degrees in the sun right now!! Three days of this sun and I can probably sand.
 
Ok after three days in direct sun with metal temps between 120-160 degrees I decided to start block sanding. The epoxy appears to be well cured and is sanding very well. It doesn’t gum the paper AT ALL.

I blocked out the roughest part of the car. This is the passenger quarter panel and door. I figure the rest of the car should be much straighter.

I have a couple of metal spots and a couple of tiny lows. So far I’ve done three stages of body work on this car. See pictures to show each stage in the quarter panel and door as examples. You can see that the lows are all filled in and a couple of tiny highs remain. It’s getting there.

3 Stages I took:

1) 2 coats of epoxy on prepped bare steel, body filler blocked with 80, then 120 and 180.

2) 2 coats of epoxy over the filler, blocked with 120 then 180 and smoothed with a red scotch bright pad.

3) 4 coats of epoxy, blocked with P220 so far.

I could use some advice here. I’m going with a single stage urethane paint. So P400 (320 conventional grit) should do it. I could spot prime and sand the tiny lows here. Then sand it all with 320 and apply a sealer coat.

OR, I could could finish blocking the car with 220, apply two medium coats of epoxy to the whole thing, let that cure and then block the car with 320.

If this was your car, what route would you take? Or would you do something else?

1C1C4E16-75B5-4ABA-AB65-F475593925A5.jpeg
 

Attachments

  • 8F3B3C85-4D31-4058-9E3E-85653DE0FA1F.jpeg
    8F3B3C85-4D31-4058-9E3E-85653DE0FA1F.jpeg
    133.7 KB · Views: 107
  • 6B9B1C93-7DD1-41B0-A112-7BF1ABDB140C.jpeg
    6B9B1C93-7DD1-41B0-A112-7BF1ABDB140C.jpeg
    131.7 KB · Views: 105
  • 66C08B20-0135-4019-B71F-F803B7879F7B.jpeg
    66C08B20-0135-4019-B71F-F803B7879F7B.jpeg
    137.6 KB · Views: 104
  • 43899135-F7A7-4C98-B89B-34B8831B68A0.jpeg
    43899135-F7A7-4C98-B89B-34B8831B68A0.jpeg
    136.4 KB · Views: 101
  • 8714B334-EAC8-4A0F-AD1B-645FE5562877.jpeg
    8714B334-EAC8-4A0F-AD1B-645FE5562877.jpeg
    147.9 KB · Views: 94
  • 617FE11C-906F-4EED-937F-E16BAEC84F6C.jpeg
    617FE11C-906F-4EED-937F-E16BAEC84F6C.jpeg
    178.6 KB · Views: 106
  • 24E5A87B-C4F8-477B-8112-E60B06663751.jpeg
    24E5A87B-C4F8-477B-8112-E60B06663751.jpeg
    134.8 KB · Views: 115
  • E67F5CBE-2B40-4BC0-A0F6-F8E40EA882B2.jpeg
    E67F5CBE-2B40-4BC0-A0F6-F8E40EA882B2.jpeg
    148.6 KB · Views: 103
  • 45B46811-BA1C-4DAC-82A7-68CB2FD60B17.jpeg
    45B46811-BA1C-4DAC-82A7-68CB2FD60B17.jpeg
    135.1 KB · Views: 113
I would finish what you have with 320 or finer, spot prime problem areas, sand those with 320, apply one coat of epoxy reduced 25-30%, wait overnight, nib sand the sealer, then shoot the single stage. At the point you shoot the single stage, there can't be any sand-throughs to metal or filler.
 
As Crash said. Just asking are the metal spots high? If so maybe a few taps with a finishing hammer before reprimer. Looks good.
 
You know, I think the metal spots are pretty flush actually. I blocked the whole side tight with 220 and it is looking really good. Took a long time to get it down though.
 

Attachments

  • 7902635B-9EDF-45AD-B468-C08817089504.jpeg
    7902635B-9EDF-45AD-B468-C08817089504.jpeg
    151.2 KB · Views: 117
This epoxy is awesome. I got it to build high and after three days in the sun it blocks very well. I finished the rear deck and roof. It’s looking great! Only one small metal burn thru on the C pillar. That area was tricky because I had replaced the entire roof panel and shaved the rain gutters in the process similar to the old 911 RUF race cars. I had to do a lot of metalwork along the roof sides. But they are blocking out perfectly with 220. A few more days of blocking and this car will be done with 220. Next I’ll take it apart and start the inside and undercarriage, then eventually finish it all up with at least 320 before sealer.
 

Attachments

  • B8151B00-BA59-4B47-8649-B9ECFE3E421E.jpeg
    B8151B00-BA59-4B47-8649-B9ECFE3E421E.jpeg
    167.9 KB · Views: 114
  • 584D1BBB-9F1E-4A4C-8BE7-F36408FED55B.jpeg
    584D1BBB-9F1E-4A4C-8BE7-F36408FED55B.jpeg
    151.7 KB · Views: 120
I got a few hours this evening to tackle the hood. It’s the largest part on the car and is tricky since it was damaged on delivery and required a lot of “adjustment” to get it fitted to the car. I blocked it down as tight as possible to the metal with 220 and it worked out all the lows. Very happy with it.
9CAFEB76-B1EB-4765-AF05-E9968080253D.jpeg
 
Last edited:
Obviously that large filler area will require a few coats spot-primed before proceeding with sealer.
 
Obviously that large filler area will require a few coats spot-primed before proceeding with sealer.
Yep I was thinking just two unreduced coats over the filler spots and sand them with 320. Then apply reduced epoxy as sealer later before paint.
 
Actually I really like how the shiny fresh epoxy works as a guide coat. Just so I don’t miss anything I’m thinking that I’ll block it all out to 320 dry, then apply two slightly reduced epoxy coats and then wet sand those with 400 just until the shine is off. That way I have all the scratches, filler and metal spots addressed. Any feedback on that plan?
 
Actually I really like how the shiny fresh epoxy works as a guide coat. Just so I don’t miss anything I’m thinking that I’ll block it all out to 320 dry, then apply two slightly reduced epoxy coats and then wet sand those with 400 just until the shine is off. That way I have all the scratches, filler and metal spots addressed. Any feedback on that plan?
Or better yet, for efficiency sake I could just finish it all out in 220. Then apply two unreduced sealer coats and block out dry with 320 very carefully (no burn thrus). 320 is fine for SS Glaso.
 
Finished the other side this evening in 220. Looks great.
 

Attachments

  • EE4B047D-C5B6-4425-B546-D1BD127EE0CA.jpeg
    EE4B047D-C5B6-4425-B546-D1BD127EE0CA.jpeg
    172.6 KB · Views: 100
  • 23692C6D-5F89-4743-BA80-2AFA870B58BE.jpeg
    23692C6D-5F89-4743-BA80-2AFA870B58BE.jpeg
    159.7 KB · Views: 95
Back
Top