You are using an out of date browser. It may not display this or other websites correctly.
You should upgrade or use an alternative browser.
You should upgrade or use an alternative browser.
production clear correction
- Thread starter hapcj7
- Start date
RosharonRooster
Promoted Users
So , 3000 to 8000?5000 Trizact has been replaced with 8000. It works very well.
I’m hooked on the wool pads with single stage which is the same as production clear.
Don
dhutton01
Backyard Hack
Yep. I go from 2500 Buflex to 8000. I am using the full JimC method…So , 3000 to 8000?
")
Don
the blade did not want to cut.
I hope you mean Scrape. Only 'cutting' done is a a drip hanging off the bottom edge of something. Plus the Clear has to reasonably cured or you just chatter across the top off the run. Brand New blade with the ends rounded and perpendicular to the panel with a slight Forward Angle towards your direction of pull.
I only use a Blade on really bad runs that using sand paper would take awhile to knock down. Not really a Novice tool.
Yes, 100%- Scrape!!!.. Thank you..Ive used the blade removal on flat areas before with success, however, the current run is on a concave section of hood.This will be challenging..I dont think the putty method with work for me, at least i dont feel comfortable trying it..I hope you mean Scrape. Only 'cutting' done is a a drip hanging off the bottom edge of something. Plus the Clear has to reasonably cured or you just chatter across the top off the run. Brand New blade with the ends rounded and perpendicular to the panel with a slight Forward Angle towards your direction of pull.
I only use a Blade on really bad runs that using sand paper would take awhile to knock down. Not really a Novice tool.
AAE
Learner
The putty method does work well. Worth a try.Yes, 100%- Scrape!!!.. Thank you..Ive used the blade removal on flat areas before with success, however, the current run is on a concave section of hood.This will be challenging..I dont think the putty method with work for me, at least i dont feel comfortable trying it..
DanMcG
Promoted Users
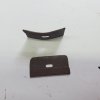
What ya got there Mike? not like my old school razor bladesCouple of old ones I found in the drawer.
Put up a pic or 2 and we'll get you some ideas.
MJM
Promoted Users
Couple of old ones I found in the drawer.
Put up a pic or 2 and we'll get you some ideas.
Okay I gotta ask. How did you bend that one razor blade?
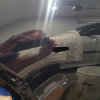
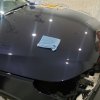
Hi all. This is the best pic i could get of the clear coat run. The run is actually worse than it appears. The swooped line you see is the run with the heavier( more material) side towards the body line in hood. Then at the bottom front edge of hood, there is section where the run is surrounded by heavier(more material)...There is still plenty of clear coat in the "low" section..... Note: This section of the hood is concave!!..This project of painting the nose of vehicle with dark metallic blue, was more than 1 step up from 2 small bumpers..-my only other painting project..The job should turn out very fine with proper paint correction..Thank you
Attachments

Last edited:
PPG. My neighbor gave me a box like in '06 maybe. Single edge.
Thing with Steel is,It will Bend,and rust.....
Cheap blades Crack,chip,Break because of their composition material which I have no idea off.I don't have any Stainless but would likely crack due to Stainless composition.
And wasn't 'Made in China'
Thing with Steel is,It will Bend,and rust.....
Cheap blades Crack,chip,Break because of their composition material which I have no idea off.I don't have any Stainless but would likely crack due to Stainless composition.
And wasn't 'Made in China'
Mike, i am not following..What other information can i give you?...The bc is Dupont chromabase, and the cc is Spi production. The rest of the hood should look very fine after a cut and polishMore interested in what the hood looks like than the problem. We got that,but what the 'topography is.
I'm Magic brother.
Barry didn't tell you all that?
I put it in my vise and tweaked it. Their very good blades and likely came from a glass company who sold PPG.
I use Them for 'special occasions' because of what they are and Don't really know where they came from but I'll ask him if he remembers.
Barry didn't tell you all that?
I put it in my vise and tweaked it. Their very good blades and likely came from a glass company who sold PPG.
I use Them for 'special occasions' because of what they are and Don't really know where they came from but I'll ask him if he remembers.
Attachments
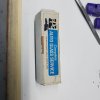

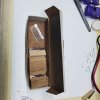
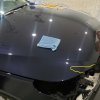
Mike the hood is a 5 series Bmw... Here are 2 additional pics... The clear coat run is located right under the straight edgeHonestly, all I'm seeing is you. No offense. But trying to see the actual curvature of the area and a straight on shot is not it. More a side angle and 'what is your vehicle? Unless I missed it if you said.
Attachments

Sorry, lost my complete reply. I use a tablet most time and hit the back arrow losing my page.
I'm guessing it is the 'blob at the Edge?
Should be no problem with the blade or preferably a small sanding block. Whatever your comfortable with. I thought you meant a tight radius.
Slow and easy. Start with 400 to test and adjust from there to cut it down with a rounded block for the curvature to level it up with the area. If you use a blade, be sure to round the edges so not to gouge into the Clear with them. I prefer Dry so you can SEE what your doing till you get it level.
How do I remember which is Convex or Concave ?
Concave is Caved-In....