Quarter Panel repair

Raymond_B

Hobbyist
Hi all, I've been lurking and trying to absorb as much as I can from this great site. Thank you to SPI for providing it! Seeing this sort of support for pros and amateurs alike is refreshing.

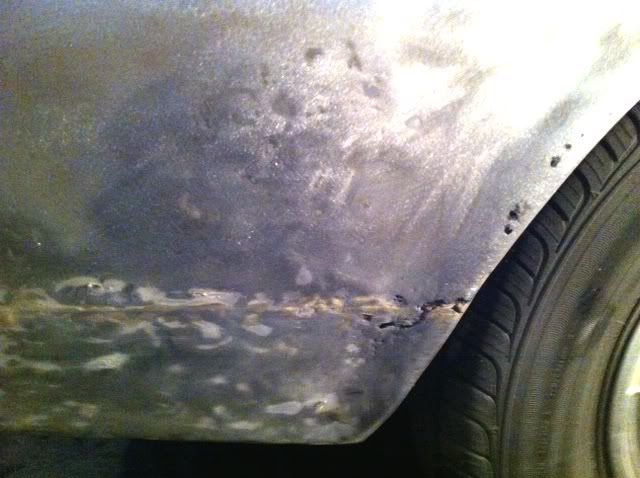
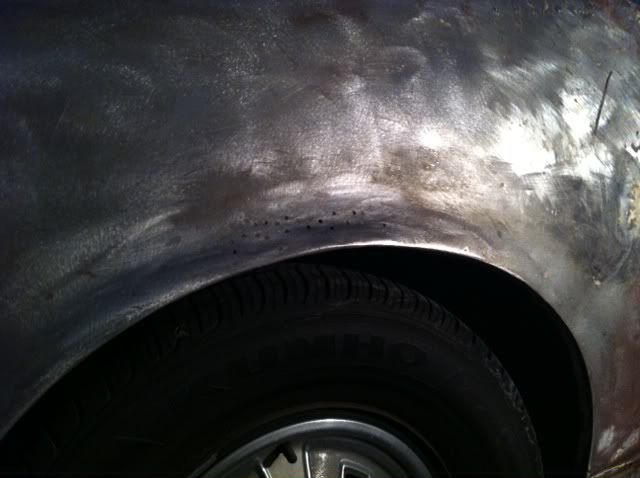
I was wondering what everyone's opinions are on a quarter panel issue. I have a 1966 Mustang coupe that I've been stripping down in preparation for bodywork and paint. I've found much more than I bargained for, so much for being a rust free "straight Texas car".......

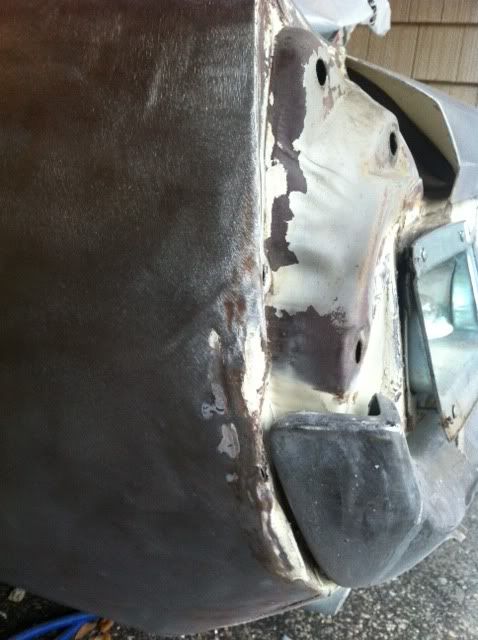
Anyway there's a lot I have to do, but I've been debating what to do with the left rear quarter panel. It looks like the previous owner was in a minor fender bender where the rear bumper pushed in the quarter panel right where the outer taillight housing and quarter panel come together. Plan A is to try to bump it out straight if I can, Plan B would be to buy a new QP and cut out what I need. Plan C would be to just replace the whole QP, but I'd hate to do that since the rest is in very good condition.

What do you guys think?

Here's the damage

RRQPdmg.jpg


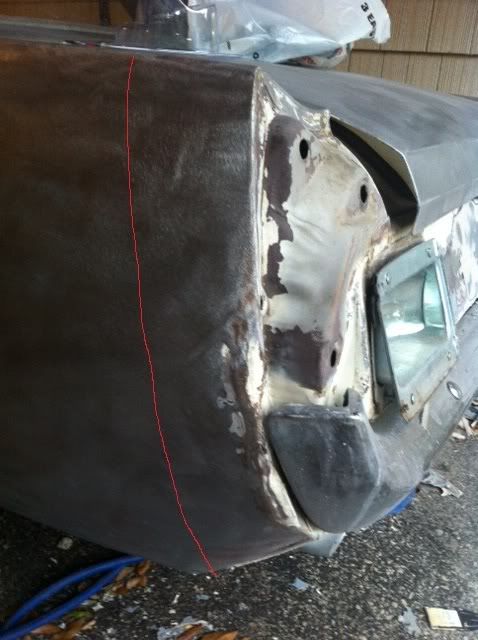
If I have to replace I thought about cutting here and butt welding a piece from a new quarter. I am worried about my welding skills, since that will be a long weld in a very visible area.

RRQPdmg1planB.jpg


Thanks,
Raymond
 
It would be very surprising if you didn't find something like that on almost any car that old. Be thankful if that is the only place you found. Yes that is very fixable and you have good access to the back side, no need to cut that out.
 
chevman;19861 said:
It would be very surprising if you didn't find something like that on almost any car that old. Be thankful if that is the only place you found. Yes that is very fixable and you have good access to the back side, no need to cut that out.

I agree, most cars get in a fender bender in 40+ years. As said that is not to difficult of a repair.

Hammer, dolly, shrinking disc , some sweat and patience is all it will take. Work it slow and easy taking the highs down and bringing the lows up.


Wray Shelins shrinking disc and video is an inexpensive investment that will pay dividends quickly for that repair.

There is much talent here, and the big dogs that possess it are always willing to help out.

Have fun!
 
Thanks guys, your input is very much appreciated! I'll check that video out, I also noticed an old metalworking book over on autobody101.com. Both seem like very good investments.


-Raymond
 
I was able to mess around a bit today. For a novice I think it might actually be working out OK. I still have a lot to do, what do you guys think?

photo12.jpg


photo32.jpg


photo22.jpg


photo24.jpg


photo52.jpg


Ugh I still have the other side, I am pretty sure it's a full replacement...

RearQuarter11.jpg


RearQuarter6.jpg
 
I am willing to bet it did not take you all that long to work that area out. Makes you wonder why it was buried in mud to start with doesn't it.
A bit of massaging with a shrinking disc and you will have that ready for a skim coat of mud instead of an inch,lol.

Yes that right hand quarter is looking a bit more ugly. You have a good start on building your skill set, go after it!
 
I've got my shrinking disc on the way to get rid of the waves, thanks for that tip! You're right it really wasn't that bad, I stared at it a lot before I did anything to make sure I didn't goof it up. I also have no idea why the folks who worked on this car buried it in Bondo in some spots. It seems to me they spent more money on that than anything else. I'll have to post pics of the driver's door and pass. side fender...... On this bad side I am really thinking of just replacing the whole quarter, but I am going to wait to see how my welding skills work out. I have my eye out for a Lincoln 140C :) Once I find a decent deal I am going to go down to some body shops, collect a few scraps, and practice, practice practice.
 
I finally had a chance to go out and try my 9" shrinking disk after watching Wray's video. One question I had which was never really addressed in the video is how long do you heat the metal with the disk? I was worried about overheating it so I would run it maybe a minute or two. When I sprayed water I could just see some steam come off the panel. Wray pointed that out in the video so I guess that's what I want?

I put a rattle can guide coat on the panel and boy that really shows where the metal is wavy. I think I hit the metal too hard from the backside when bumping out the damage. I've been working out both sides trying first to work on the low sides like Wray did in the vid, but I finally bumped a couple out from the back. I'll post some pics, but I'm not sure I made much progress.
 
Use a big poster sharpie...block it ...determine what is high or low...ink again....repeat until you are close... use the disc wisely and dont over shrink.. if you pay close attention to the disc you will notice it will just start to wobble when it is ready. Wet ...towel dry....check for galling ...soap disc or panel.. repeat all steps.. you will find some great info on metalmeet.com they are the spi of metal
 
When is it straight enough? Yeah that's open to interpretation :) I've bumped and shrunk it a few times (using everyone's excellent advice), but I am wondering when do you stop? I know a pro could probably have it smooth as glass in the number of hours I've spent on it, but I'm not sure when to simply stop. I don't want to damage the metal.

I have my SPI black epoxy already here, but I was thinking of picking up some high build primer to finish off this area since it's not 100% smooth. If I top that with another coat of epoxy it should be OK while I finish (which could be a while) the rest of the car correct?

Anyway here's a quick pic of the quarter in a couple different spots using my small slapper as a straight edge.

IMG_2511.jpg


IMG_2510.jpg
 
Flanges, body lines, and edges have an affect on the panel, and it looks like a little more work on the edge would get you closer to where you want to be. But what you have there now is very good, and most would call it good enough.
 
If you don't want to use filler, you have a ways to go. But if you don't mind a skim of polyester putty, you might be well within tolerance. It's hard to tell from pictures, you must use your own judgement.

I remember seeing from your initial pictures that the rear body and taillight opening looked damaged, have you tried all your parts on for fit, including lamp, extension, and bumper?
 
I've been out of town, sorry for the slow reply. I've test fit the trunk lid end cap and the alignment looks fine, but the problem looks to be the "sharpness" of the edge of the quarter panel where it meets the end cap. I'll have to post a pic, but basically since the damage pushed the corner in I am having a hard time bringing it back out to a perfect 90 deg edge. The metal is also very thin in the corner, I tried using a comma (I think is what it's called) dolly, but I am afraid it will tear the metal.

I think the "crispness" of the edge might have to be a place I use some filler on to correct. I'll post some pictures to explain better.
 
As for welding. You really only need to get a MIG with Gas and learn to produce a decent "spot" weld about 1/8" in diameter. Welding on panels is a series of these spot welds spaced far enough apart to prevent warping the panel. Eventually you are welding spot to spot forming a continuous bead.
 
Back
Top