Touch up blending...

Prprop143

Promoted Users
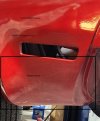
I have finished my BC/CC and found a couple of areas on the bottom of the rockers that didn't get enough paint coverage. It is a red metallic BC with Euro 2020. My question, should I scuff the missed areas as well as the blend areas or do I need to sand the areas. If sanding should I use dry 800 or higher? The job is about 10 days old and I was getting ready to start color sanding when I discovered this issue. I'm assuming no hard stop points for the blend, but should I mask the area above the rockers about 12" to avoid overspray on the good areas?
Thanks for any advise...
 
600 will be fine, sand anywhere the fresh color and clear will be applied. I would cover everything, just don't use plastic sheeting on it. I would use 36" white paper on the sides, then lay 2 layers of old bed sheets on the hood, roof, and trunk areas.
 
You will want to clear the whole panel for best and long lasting results. So mask off everything else.

I would dull the surface of the panel with a gray scotchbrite pad and wipe clean with 710 solvent based W&G remover.

Since it's freshly painted you won't or shouldn't have any mismatch problems.

Once the base coat is applied and ready for top coat, clear the whole panel.
 
Playing devil's advocate. I know perfection is the goal but are the spots noticable to anyone that's not on their back? Sometimes a little imperfection is better than dealing with possible issues from repairing.
 
600 will be fine, sand anywhere the fresh color and clear will be applied. I would cover everything, just don't use plastic sheeting on it. I would use 36" white paper on the sides, then lay 2 layers of old bed sheets on the hood, roof, and trunk areas.
Thank you for helping with this. I kind of figured that would be the process, but wanted a more experienced point to view...
 
You will want to clear the whole panel for best and long lasting results. So mask off everything else.

I would dull the surface of the panel with a gray scotchbrite pad and wipe clean with 710 solvent based W&G remover.

Since it's freshly painted you won't or shouldn't have any mismatch problems.

Once the base coat is applied and ready for top coat, clear the whole panel.
Appreciate your insight and experience in this forum. I will be following this pretty close.
 
Playing devil's advocate. I know perfection is the goal but are the spots noticable to anyone that's not on their back? Sometimes a little imperfection is better than dealing with possible issues from repairing.
Ya I'm very picky and so is the customer. And it has areas that are not bad and some areas that I just missed. I'm a little older (retired) and bending over can be challenging for me. I'm thinking about building a rotisserie over the winter.
Thanks for chiming in...
 
  • Like
Reactions: AAE
Ya I'm very picky and so is the customer. And it has areas that are not bad and some areas that I just missed. I'm a little older (retired) and bending over can be challenging for me. I'm thinking about building a rotisserie over the winter.
Thanks for chiming in...
Thought it might have been a personal vehicle.
 
Once I put this on the lift I found another area on the bottom of the rear Qtr Panel, which I have prepped and wanted to make sure I'm heading in the right direction. I hope the attached layout illustrates what I am doing. Areas need BC are in the square boxes, the rest of the Qtr Panel has been scotch bright (Pink). I was planning to mask it at the transition body line shown in the pic and up to cover the existing paint. I was going to feather in the BC at the square transition areas. the other Qtr panel is similar, but only the bottom rear corner of the Qtr panel need paint.I still have the rockers but those are pretty straight forward with no Doors on yet...

Thoughts??
 

Attachments

  • repair area-1.jpg
    repair area-1.jpg
    126.2 KB · Views: 71
Here is the other side. I only started sanding the bottom corner, but will use pink scotch bright on the balance of the Qtr Panel. Same plan for masking to protect existing paint...

Thanks Guys!
 

Attachments

  • repair-3.jpeg
    repair-3.jpeg
    103.2 KB · Views: 71
Back
Top