Yes Ms.Spears, I did it again!!!! Lol

Lou

Promoted Users
Hey guys I did in again.
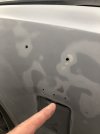
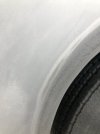
I sanded through to the metal…..
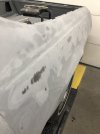
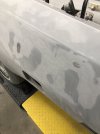
What I have on there now is 5 coats of epoxy primer which has been lightly sanded between coats 2&3 and again after coat 4. Then I did most of my bodywork before applying the 5th coat so I could see imperfections which there was so I corrected with more filler.
After 48 hours I applied 4 coats of high build primer and let it set for 4 days.
My problem is I keep sanding through to the metal is small areas.
Now that the car is blocked down and still needs some filling that could be fix with laying up build primer what do I do about the exposed metal ?????
Should I shoot a full coat of epoxy then the build primer????
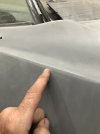
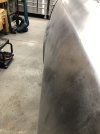
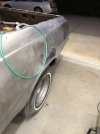
 
Well...If you hit bare metal in small "areas" those places weren't ready for high build primer or you just sanded too much. No matter how much epoxy, high build ect you have when you first see metal stop sanding. It's not going to get flatter after you hit steel. JMO I think you need more epoxy, lightly block that and see where you are. I'm assuming you are a novice like me.
 
Well...If you hit bare metal in small "areas" those places weren't ready for high build primer or you just sanded too much. No matter how much epoxy, high build ect you have when you first see metal stop sanding. It's not going to get flatter after you hit steel. JMO I think you need more epoxy, lightly block that and see where you are. I'm assuming you are a novice like me.
That's a good reason to use only epoxy, never a wrong next step.
 
Well...If you hit bare metal in small "areas" those places weren't ready for high build primer or you just sanded too much. No matter how much epoxy, high build ect you have when you first see metal stop sanding. It's not going to get flatter after you hit steel. JMO I think you need more epoxy, lightly block that and see where you are. I'm assuming you are a novice like me.
Hey Rock, Thanks, Yes I’m new to this. I’m a woodworker by trade so sanding usually fixes everything!!!!
I have always been heavy handed and listening to my favorite classic 80srock doesn’t help when it gets me pumped up!!!! I’m working on my 73 El Camino which is loaded with compound curves. I bought the prior owners mess of epoxy primer shot over the perfect repaint finish. They never even scuffed the clear coat. To fix his mistake he sandblasted and used a grinder of some type which scared the sheet metal everywhere.
The idea of using the high build was fill those scars which it did except a few which I believe I can fill with a few more coats of high build. The high spot I’m hitting might be caused from the sandblasting.
I’m trying to decide between, spot shooting the epoxy to cover the bare metal then shoot 2or3 more coats of high build then block and shoot thinned epoxy to seal….. OR fix the few low spots and shoot the whole car with a few coats of epoxy primer then one coat thinned out as the sealer.
Open to suggestions, thanks!
 
If you build too much high build urethane it’s likely going to shrink down the road on you imo. Poly primer would have been a much better choice imo. Other opinions may vary….

Give it plenty of time before proceeding to final paint. Weeks to months imo…. Some time in the sun wouldn’t hurt either.
 
Have you been using guide coat?
So I redid a coat of guide and blocked it again to show what’s still showing as low. I didn’t go down into the wheel well flair but you get the idea.
IMG_5518.jpeg
IMG_5521.jpeg
IMG_5522.jpeg
 

Attachments

  • IMG_5510.jpeg
    IMG_5510.jpeg
    68.5 KB · Views: 19
  • IMG_5513.jpeg
    IMG_5513.jpeg
    66.5 KB · Views: 20
  • IMG_5514.jpeg
    IMG_5514.jpeg
    93.4 KB · Views: 19
  • IMG_5515.jpeg
    IMG_5515.jpeg
    97 KB · Views: 16
  • IMG_5512.jpeg
    IMG_5512.jpeg
    84.9 KB · Views: 18
  • IMG_5511.jpeg
    IMG_5511.jpeg
    82 KB · Views: 19
I generally shoot 2 coats of epoxy on bare metal. Then when cured lightly block sand it. This will reveal all the highs and lows early in the process.
Any metal work can be done and another coat of epoxy, followed by 3 coats of 2k build primer.
 
I am curious grits have you been sanding with at each stage and with what blocks?

What gun and nozzle size are you shooting high build primer with?
 
Lou is that a replacement quarter panel you're dealing with? Just curious why all the high spots below the body line.
 
Got any pictures of those areas? May need some metal bumping/finesse or ???
Lou is that a replacement quarter panel you're dealing with? Just curious why all the high spots below the body line.
No it’s original, I didn’t block below the top of the wheel well for the pictures. I just wanted to show what’s left after blocking.
 
I am curious grits have you been sanding with at each stage and with what blocks?

What gun and nozzle size are you shooting high build primer with?
Ok, I’ll tell you. Just remember I haven’t done this before!!! Lol
Sand car to metal 40/60/80
Prep for epoxy primer 80 because it sat a few weeks before getting to spray.
LVLP R500 gun 25 ish psi at gun.
First few coats of epoxy 2.0 tip
Did some body work with Rage gold then sprayed another few coats of epoxy but used a1.3 tip to save on epoxy because I was running low. Let car cure for 48hours in heated garage at 70 degrees.
Didn’t sand between epoxy and high build because I was in the window.
4 coats with 2.0 tip for high build primer but raised the pressure to almost 30 psi which was a mistake. It sprayed really dry and building up on the nozzle and blocking the air jets.I was told that it was too high of psi.
Let it dry 4 or 5 days before blocking .
I’m using a bunch of different blocks. Some EVA foam dura blocks assorted sizes. 5” DA with 220 to knock down the roughness of the high build. I also made a few flexible long boards . You’re going to laugh when you see them!!!!!! Lol They range from 12” to 72”!!! I used 2”pvc for the spine and 3/8” thick pvc sheets.
Mostly been using 320 then 400 for blocking. For the compound curves I used the a 3”. Sander and 5” da both with double stacked foam pads to help avoid burn through. Been using Mirka dry guide coat.

IMG_5472.jpeg
IMG_5525.jpeg
IMG_5524.jpeg
 
Ok, I’ll tell you. Just remember I haven’t done this before!!! Lol
Sand car to metal 40/60/80
Prep for epoxy primer 80 because it sat a few weeks before getting to spray.
LVLP R500 gun 25 ish psi at gun.
First few coats of epoxy 2.0 tip
Did some body work with Rage gold then sprayed another few coats of epoxy but used a1.3 tip to save on epoxy because I was running low. Let car cure for 48hours in heated garage at 70 degrees.
Didn’t sand between epoxy and high build because I was in the window.
4 coats with 2.0 tip for high build primer but raised the pressure to almost 30 psi which was a mistake. It sprayed really dry and building up on the nozzle and blocking the air jets.I was told that it was too high of psi.
Let it dry 4 or 5 days before blocking .
I’m using a bunch of different blocks. Some EVA foam dura blocks assorted sizes. 5” DA with 220 to knock down the roughness of the high build. I also made a few flexible long boards . You’re going to laugh when you see them!!!!!! Lol They range from 12” to 72”!!! I used 2”pvc for the spine and 3/8” thick pvc sheets.
Mostly been using 320 then 400 for blocking. For the compound curves I used the a 3”. Sander and 5” da both with double stacked foam pads to help avoid burn through. Been using Mirka dry guide coat.

View attachment 30804View attachment 30805View attachment 30806
Honestly, you have yourself a mess. It is normal to want to get done as fast and efficiently as possible, thus spraying urethane primer on before it is ready. Which is what it appears to me has happened. It seems, to me, you really need more filler to make the bedside straight. Probably in the end it would be faster and easier to DA it down to bare metal and start with epoxy and filler from scratch. I know that sounds extreme, it is but, you have started with urethane build primer, which is for refining scratches, when you really needed more filler or some pro grade metal bumping. Sorry, you could pile a coat of urethane glaze on and sand that, but that is pretty sketchy as far as durability and long term finish. Someone with better advice will probably chime in, I hope so, but sometimes learning is hard.
 
Lou is that a replacement quarter panel you're dealing with? Just curious why all the high spots below the body line.
To fix his mistake he sandblasted and used a grinder of some type which scared the sheet metal everywhere.

Lou, this is more an FYI... To elaborate on Dan's observation that it may have had a replacement quarter put on:


Lou's Quarter.jpg


The red line "appears" to be where a weld line would have been placed, and in the vicinity of the body line would have been a good choice for weld location as the body line helps to control any distortion above. As one would expect, a weld shrinking as it cools would lead to material being pinched together which would show as a sinusoidal wave, or as shown above, the high low high low (repeat) pattern. IF this had been damage from a weld, planishing the weld (stretching) using hammer and dolly would help to relax the gathered material and as the weld stretches the wave begins to disappear. If there is indeed no weld seam along that area, then an overzealous dose of media blasting would also cause stretch and result in a wave, as the metal pushes outward and forms the wave as it has to go somewhere. It is going to be difficult to gain access to the back side for any attempt at off-dolly, or more preferred, donut dolly, so you will need either a heating tip on a dent puller, a shrinking disc, or a torch. I list those in order of my preference when donut dolly is not feasible. The heating tip will be the least aggressive and will allow you to sneak up on the fix, rather than shrink too much and now you have loose, floppy oil cans. I would add that regardless of a high or low, it is all stretched metal, so don't focus so much on the direction it went, just that expansion of the metal caused it to move both inward and outward. I'd also point you to this post, Repairing sandblast damage, as it has some insight on different methods of repair.
 
Last edited:
Ok, I’ll tell you. Just remember I haven’t done this before!!! Lol
Sand car to metal 40/60/80
Prep for epoxy primer 80 because it sat a few weeks before getting to spray.
LVLP R500 gun 25 ish psi at gun.
First few coats of epoxy 2.0 tip
Did some body work with Rage gold then sprayed another few coats of epoxy but used a1.3 tip to save on epoxy because I was running low. Let car cure for 48hours in heated garage at 70 degrees.
Didn’t sand between epoxy and high build because I was in the window.
4 coats with 2.0 tip for high build primer but raised the pressure to almost 30 psi which was a mistake. It sprayed really dry and building up on the nozzle and blocking the air jets.I was told that it was too high of psi.
Let it dry 4 or 5 days before blocking .
I’m using a bunch of different blocks. Some EVA foam dura blocks assorted sizes. 5” DA with 220 to knock down the roughness of the high build. I also made a few flexible long boards . You’re going to laugh when you see them!!!!!! Lol They range from 12” to 72”!!! I used 2”pvc for the spine and 3/8” thick pvc sheets.
Mostly been using 320 then 400 for blocking. For the compound curves I used the a 3”. Sander and 5” da both with double stacked foam pads to help avoid burn through. Been using Mirka dry guide coat.

View attachment 30804View attachment 30805View attachment 30806
@Dean Jenkins You got your work cut out for you! Where’s your 6 foot block?? lol
 
Lou, this is more an FYI... To elaborate on Dan's observation that it may have had a replacement quarter put on:

Thanks, here are pictures from when I sanded it down to metal. The pictures that you are pointing out as highs and lows, light gray epoxy is the first layer on the steel , dark gray is high build which is on top of epoxy. The quarter is original. A camera scope with 6ft lead through the door jam vent hole verified that. There is a patch panel on the lower 8 inches of the quarter panel. The reason for the waves is the filter primer filling in where the previous owner used a grinder to remove the botched paint job and eliminate the molding studs.
IMG_4675.jpeg


View attachment 30826


The red line "appears" to be where a weld line would have been placed, and in the vicinity of the body line would have been a good choice for weld location as the body line helps to control any distortion above. As one would expect, a weld shrinking as it cools would lead to material being pinched together which would show as a sinusoidal wave, or as shown above, the high low high low (repeat) pattern. Although for a weld, the wave should have been slightly closer.. IF this had been damage from a weld, planishing the weld (stretching) using hammer and dolly would help to relax the gathered material and as the weld stretches the wave begins to disappear. If there is indeed no weld seam along that area, then an overzealous dose of media blasting would also cause stretch and result in a wave, as the metal pushes outward and forms the wave as it has to go somewhere. It is going to be difficult to gain access to the back side for any attempt at off-dolly, or more preferred, donut dolly, so you will need either a heating tip on a dent puller, a shrinking disc, or a torch. I list those in order of my preference when donut dolly is not feasible. The heating tip will be the least aggressive and will allow you to sneak up on the fix, rather than shrink too much and now you have loose, floppy oil cans. I would add the regardless of a high or low, it is all stretched metal, so don't focus so much on the direction it went, just that expansion of the metal caused it to move both inward and outward. I'd also point you to this post, Repairing sandblast damage, as it has some insight on different methods of repair.
72123804689__7794ED44-F291-4EEC-82EE-4BC9D7EFB24D.jpeg
IMG_4177.jpeg
IMG_4176.jpeg
 

Attachments

  • IMG_4175.jpeg
    IMG_4175.jpeg
    115.7 KB · Views: 12
  • IMG_4169.jpeg
    IMG_4169.jpeg
    118.5 KB · Views: 14
Back
Top