Corvette Painting Questions and Plan

Tempest302

New Member
Introduction
Hey guys, been reading around the forum and the internet in general (best help was here by far) for how to paint my 1990 Corvette. Pulled together some information and was hoping I could get input on my plan and if it is totally wrong or on the right track. All comment welcome and thanks for the help!

Car is a 1990 Corvette in black. I would like to repaint to black. Was an Arizona car and the paint is sun burned until it’s a chalk like consistency. I tried to get it painted in Arizona but, long story short the guy shot primer on it without sanding or doing more than masking the windows (I am going to need new taillights and such due to the primer on them) and pretty much ruined what little quality I had. At this point, I am going to do it myself since I can't really hurt the car anymore than it is and it is something I would like to learn.

Tool Discussion
I have a compressor but it is 5 SCFM at 90 PSI. No way to get a bigger compressor due to no 220V line and I would need a new electric panel for a new circuit as ours is full. My understanding is that this is not enough compressor for air sanding or for painting.

My thoughts for getting around this an electric DA and a turbine HLVP system. I would love recommendations for tools but my current plan would be an Apollo Precision 5 – Pro for the HLVP system and I have no idea what sort of electric DA would be recommended. Spending money on tools does not bother me so I would really appreciate recommendations and thoughts on both the DA and the HVLP system.


Order of operations

Strip

Strip down the primer/paint on it down to SMC using DA (assuming this not a terrible plan) and hand sanding. Looks like 180 grit is recommended for stripping SMC.

Questions:
  • Can I use a DA or is this a no no on a Corvette?
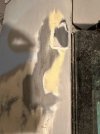
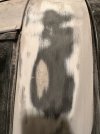
  • What color am I sanding too? I think it is the dark grey color in the picture but there is also that yellow color I have heard is the SMC. Anyone know?
  • Is 180 the correct sanding grit? I have no idea on sand paper. I do know use auto sandpaper from an autobody store not home depot.
  • Do I need to strip the urethane bumpers or can I just rough them up and spray with epoxy primer?
Repair fiberglass/SMC cracks.
Car has no major damage anymore, though I did replace one panel and probably used the wrong filler based on more recent research (fiberglass filler versus SMC). My plan was V out the joint area and fill using Adtech P-17. Car is originally from Arizona and sat in the sun, resulting in little cracks in the paint and substrate. My understanding is that these need to ground down (mini grinder with wheel?) until they are gone and then filled with P-17 or another SMC filler and then sanded smooth

Questions:

Do I epoxy and then fill or fill then epoxy?

Paint with SPI Epoxy.
Wash the fiber glass with soap and water only. Let sit for 24 hours. Do not use wax or oil remover as they will do bad things with the SMC and paint adhesion. Paint the car with 2-3 coats of SPI epoxy and sand. And then perform one final coat to seal.

Questions:
  • I read somewhere that the final coat of primer should be cut with more reducer?
  • The forums mentioned using multiple coats of epoxy instead of the 2k primer for SMC. Is this correct or should it be 1-2 coats of epoxy, 2k primer, epoxy primer as sealer?
  • Is my understanding of the “don’t use wax and oil removers correct? Is there another surface prep step I need?
  • Do I still need to use a tack cloth before spraying layers or avoid that because SMC?
  • Will Apollo HLVP system handle the epoxy primer? What about the 2k?
  • Do I need to block between epoxy coats? What about sanding the sealing coat?
Paint with basecoat
Car is black so I read wait at least 45 minutes between base coat layers. I was going to go with the SPI black to keep manufacturer consistent. Looks like two to three coats is recommended.

Questions:

Do I need to sand the color?
Any benefits or harm to using more or fewer coats of base?

Spray clearcoat. Was going to use the Non-CA clear. 4-5 coats appears to be the recommendation. Lets sit, sand at leisure.

Questions:

None but comments welcome.


Cracks and SMC Layer Pictures
Image0 (1) is a picture where that shows the layers on the car. My question is what color is the "sand to this color" layer? is it that yellow color or the more grey color? Picture is from the rear quarter panel.
Image(1) is the same, on a different area on the car. I think the dark grey is the SMC, or do I go until I see yellow (or is the halo different then the quarter panel). Picture is from the halo.

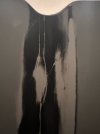
Image 2 are example pictures of the cracks in the paint. The picture is of the worst cracks and it is not sanded all the way down. My understanding is I fix these by sanding until they are gone, and then covering the area with Adtech P-17. Is this correct?

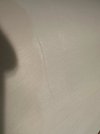
Image 8 is a typical crack in the finish. Do I use the same approach with these or do something else due to how minor they are?

Conclusion
Thanks if you managed to get through my wall of text. Any recommendations or corrections are greatly appreciated. Trying to do this right.
 

Attachments

  • image0 (1).jpeg
    image0 (1).jpeg
    163.6 KB · Views: 74
  • image1 (1).jpeg
    image1 (1).jpeg
    162.1 KB · Views: 74
  • image2.jpeg
    image2.jpeg
    72.5 KB · Views: 70
  • image8.jpeg
    image8.jpeg
    80.5 KB · Views: 71
I can't answer all your questions in one sitting. I would recommend you search and read here on the forum. Use google in the forum of site:spiuserforum.com "your keywords" instead of the site search as it will pull up results for everything. Site search doesn't work with shorter words.
Anyways first thought is that you really need a compressor. Turbine systems have been around for 30 years and I have never really heard of anyone having consistent success using one. Really have never seen them in use a Shop and I've been around this work for 30 or so years.

Me personally I would install a subpanel and purchase a decent compressor. I really can't recommend you go the turbine route. It's like trying to learn to play basketball with a hand and a foot tied behind your back. And your playing a 7 footer. Turbine is popular in the woodworking industry but in our industry they are not and they can have issues spraying the products we use. No turbine is going to spray Universal very well IMO. There are several threads here of guys struggling to use them to spray.

As for wiping down, there is a sticky thread on here about how to wipe down. Your case you would use SPI 700 on bare SMC. 700 is a waterbased cleaner.

Cracks you have pics of look like stress cracks to me. Often happens as secondary damage when a fiberglass body gets hit. I don't know if that;s the case with your car but Vettes often stress crack all over the body. You need to strip it to SMC to assess how many cracks there are and where. I've seen Vettes with hundreds of those stress cracks. But heres the thing the P17 is a filler. One of the best but it is a filler. If the crack is throughout then you are not really gaining the strength you need to permanently repair it. You would need to use an epoxy resin and SMC compatible cloth. The P17 may be strong enough on it's own or it may not be. If you have dozens of those types of cracks it's indicative of stress cracks and often hard to permanently repair.

WHat I would do before V'ing out the cracks is to strip it to bare SMC. Ideally with a razor blade and heat then go over it with 180 on the DA. Change paper often. You could go coarser but seeing you are completely new to this 180 is safer. After going over it, blow it off and see what remains. Again ideally you would use an SMC resin and SMC compatible cloth to repair any real stress cracks. Use the P17 to fill any voids etc. If they aren't truly stress cracks the simplest method would be to apply SPI epoxy over the cracks after proper prep. The epoxy is flexible so it would cover the crack and not let them show through to the final surface.

The color of the SMC is gray. In the second pic you post you can see bare SMC inside the black area. Everything else is primer/paint of some sort. A good way to strip paint on a fiberglass car is to use a heat gun and razor blade.
 
Hey Chris,

Thanks for the recommendation. I had/have tried to use the search function, you are right, its not the best. Using google to site search is a great idea I did not think of. Found the sticky you mentioned so thanks for that as well.

Also, thanks for the info about stress cracks. I thought they were just cracks in the finish from sitting in the AZ sun. I started stripping with a razor blade and heat gun and ( the little I have done) is going well. I imagine I will be back here when I get that done for some input on the stress cracks regarding which need a full repair versus P-17.

I looked into compressors and found a Quincy 60 gallon 5HP (https://www.tptools.com/FS-Curtis-5HP-2-Cyl-2-Stage-60-Gal-Air-Compressor,9679.html?b=d*13235) that I like. Going to get an electrician out here to look at the sub panel and find out if it is 500 or 5000 dollar problem.

Thanks again for the input! (Also saw your post in your sig about consultation and you might hear from me at some point regarding that service)
 
To Tempest Please don't take this the wrong way but the compressor you are looking at is OK but it is not a Quincy plus not liking that it's slpash lubication. Ok for the home small repair shop but with compressors and paint guns buy the best.
 
Looks to me like the first order of business is to set up a place to work, which is not directly mentioned in the OP. Being able to do decent body and paint demands investment in several things at minimum, a good supply of clean dry air, a heated work area, and a way to filter and exhaust large volumes of air. Typically this alone will be a large part of the investment into being able to take a vehicle from start to finish.
 
To Tempest Please don't take this the wrong way but the compressor you are looking at is OK but it is not a Quincy plus not liking that it's slpash lubication. Ok for the home small repair shop but with compressors and paint guns buy the best.
Whoops, that is me fat fingering it. I meant Curtis. I am new to large air compressors and did not know there were different types of lubrication. I will look into that, thanks for pointing it out. And this is happening in my residential garage so small home repair shop is probably too kind a description. Guy in his garage is more accurate :)


Looks to me like the first order of business is to set up a place to work, which is not directly mentioned in the OP. Being able to do decent body and paint demands investment in several things at minimum, a good supply of clean dry air, a heated work area, and a way to filter and exhaust large volumes of air. Typically this alone will be a large part of the investment into being able to take a vehicle from start to finish.

Hey Crash,

Thanks for the input. I have learned a lot in just the 3 replies.

My place to work is my garage (small two car garage) and maybe purchasing a canvas 4 sided carport thing in my driveway if that would be a cleaner environment. I have been looking at air filtration and venting/heating but to be honest, a full on paint booth is not going to happen due to money and space constraints. I am trying to do this as right as I can within my constraints. Space heaters and filters on box fans is likely as good as it is going to get unless there is a solution I am missing?
 
Tempest, I use a Campbell Hausfeld 6hp/60gal upright, it's 10.2cfm at 90psi. It's adequate for one man with air tools and most shop use. When painting an overall with my camair ct30 dryer connected, it's barely adequate and I think that I get by on experience and knowing how to work on the ragged edge like this. But every time I do an overall it makes me want a good step bigger. This size, with a small shop and shorter lines and hoses will get you through an overall and if you're only going to do one, this is probably the minimum I'd advise. Consider it your MOST valuable tool in the shop. I'd buy this first even if it put the job off a little while to recoup funds.

That Curtis compressor in the link, I wish I had that, even with splash lubrication...
 
Last edited:
When looking at compressors don't let HP claims fool you.
Look at CFM,
Most foreign compressors exaggerate their HP size, look
at amps the motor draws right on the motor plate and
that will tell you the truth.
My Eaton 5 HP puts out 17 cfm @ 90 psi.
 
Also on that corvette, spi epoxy will be your biggest advantage, put only this on bare glass or smc. And Evercoat Poly Flex will be your friend with all the hairline stress crack areas all over the car. IMHO, I would resist the temptation to use sprayable polyester filler, I found that by the time you work the surface texture to flat, you could have done the same with several coats of epoxy (put them all on first then sand with a light touch with 150g to level your panel) and had a better quality product on there.
 
Last edited:
Curtis has been building compressors in the US for 125 years and they make good stuff. In the current offerings from Quincy, their cheapest splash lubricated 2 cyl 5 hp compressor is the QT-5 at $3200. The pressure lubed QP-5 is about $3800. Or you can go whole hog and get a QR series with the 325 pump (pressure lube, disc valves, spin on oil filter) for something north of $5000.

For the OP's use, the Curtis compressor he linked up above would be more than adequate and should last for as many years as he'll want to use it. For home shop use, I wouldn't even consider paying the price premium for any brand of pressure lubricated pump. Even Quincy says in their literature, with normal maintenance, a pressure lubed pump should last 15% longer than a splash lubed one, but the price premium is way more than 15%. If I was in the market for a 5hp compressor, I'd jump on that Curtis as it is a known good brand and TP's price is about $500 less than most of the other internet peddlers are asking for the same machine.
 
A good compressor with splash lubrication will last a lifetime
if taken care of, to many other more important things
to be concerned about than splash lubrication.
 
Comparing that curtis to my cheap (lowes) CH, 30 percent more airflow at double the pressure, and 1 less HP, that tells the story. I've run this compressor for 17 or so years, replaced the (chinese) pump once and pressure switch once, so not complaining but the ratings are obviously exaggerated as I would expect from imports. Yea, I really wish I had that curtis, it's real quality, and that price is shipped! Maybe after tax season if I have anything left...
Oh, and the reason for the pump change was crank seal leak and I didn't feel like replacing the seal.
 
Hey guys, thanks for the input on the compressor. Matches up with my research and makes me feel more comfortable with getting it.

Also on that corvette, spi epoxy will be your biggest advantage, put only this on bare glass or smc. And Evercoat Poly Flex will be your friend with all the hairline stress crack areas all over the car. IMHO, I would resist the temptation to use sprayable polyester filler, I found that by the time you work the surface texture to flat, you could have done the same with several coats of epoxy (put them all on first then sand with a light touch with 150g to level your panel) and had a better quality product on there.

Thanks Slofut, I was planning on using the SPI epoxy for any building I might need on the primer side but confirmation is really nice to have. As for the Evercoat, how does the use case of this product differ from the Adtech P-17?
 
The polyflex is made for urethane bumpers and flexible pieces. In my case I had a door that had been pushed in but not broken, showing an oval pattern of stress cracking about 12" wide. The cracking showed through the epoxy and regular filler and as it wasn't low enough for a layer of P17, which cures hard like plastic. Chris recommended I try the polyflex. It worked perfect. Corners, areas where you need strength or if you have to have a thicker build I'd use P17, it's amazing stuff. Areas that look like it might oil can to a degree, I'd use polyflex. But after you use a bit of both products you'll get the idea and know what best fits your situation. On a corvette you'll need both. At the corners of openings like the headlight openings, hood opening etc I would reinforce on the backside with glass mat and use polyflex on top to hopefully minimize the inevitable cracking later. I'm lucky so far a couple years later. C3 Corvettes twist a LOT. Don't make your panel gaps too small, leave room for railroad tracks, speed bumps and ramps.
 
The polyflex is made for urethane bumpers and flexible pieces. In my case I had a door that had been pushed in but not broken, showing an oval pattern of stress cracking about 12" wide. The cracking showed through the epoxy and regular filler and as it wasn't low enough for a layer of P17, which cures hard like plastic. Chris recommended I try the polyflex. It worked perfect. Corners, areas where you need strength or if you have to have a thicker build I'd use P17, it's amazing stuff. Areas that look like it might oil can to a degree, I'd use polyflex. But after you use a bit of both products you'll get the idea and know what best fits your situation. On a corvette you'll need both. At the corners of openings like the headlight openings, hood opening etc I would reinforce on the backside with glass mat and use polyflex on top to hopefully minimize the inevitable cracking later. I'm lucky so far a couple years later. C3 Corvettes twist a LOT. Don't make your panel gaps too small, leave room for railroad tracks, speed bumps and ramps.
This is really helpful. Thanks for the tips. I have a lot of the very small cracks so this will be helpful. And its a C4, so its not quite as bad as the C3s, but I still would not call the body particularly rigid, so good point on the panel gaps.
 
I'm not sure I would use Polyflex over any sort of cracks, it doesn't have any structural properties afaik, being for small cosmetic repairs only. Did @Chris_Hamilton really recommend such a procedure?
 
I'm not sure I would use Polyflex over any sort of cracks, it doesn't have any structural properties afaik, being for small cosmetic repairs only. Did @Chris_Hamilton really recommend such a procedure?
Wasn't me.:) My reco in this thread was smc resin and cloth for any real stress cracks. P17 for any filler use. I don't recall recommending polyflex for something like this. Don't think I would have.
 
Possibly the Polyflex being referred to is not Evercoat 411, though that's the only Polyflex I know of. Evercoat 411 has no structural properties, and if it is put over cracks, it may eventually crack, too.
 
I could have sworn it was Chris guys, sorry if I'm mistaken, it was a couple years ago. But have I got the product right? It's the Evercoat flexible filler for I think, urethane bumpers. And it did work wonders on the areas that tend to crack on corvettes. So far, and I really don't want to jinx it, but no cracks. I did reinforce those areas underneath but there were places where the stress lines were really deep and I didn't want to grind all the way through. In particular, a spot on the drivers door that was oil canned and I didn't want to re-skin it. I expected the lines to come right back through but after two years it's still good.
 
Back
Top