Tempest302
New Member
Introduction
Hey guys, been reading around the forum and the internet in general (best help was here by far) for how to paint my 1990 Corvette. Pulled together some information and was hoping I could get input on my plan and if it is totally wrong or on the right track. All comment welcome and thanks for the help!
Car is a 1990 Corvette in black. I would like to repaint to black. Was an Arizona car and the paint is sun burned until it’s a chalk like consistency. I tried to get it painted in Arizona but, long story short the guy shot primer on it without sanding or doing more than masking the windows (I am going to need new taillights and such due to the primer on them) and pretty much ruined what little quality I had. At this point, I am going to do it myself since I can't really hurt the car anymore than it is and it is something I would like to learn.
Tool Discussion
I have a compressor but it is 5 SCFM at 90 PSI. No way to get a bigger compressor due to no 220V line and I would need a new electric panel for a new circuit as ours is full. My understanding is that this is not enough compressor for air sanding or for painting.
My thoughts for getting around this an electric DA and a turbine HLVP system. I would love recommendations for tools but my current plan would be an Apollo Precision 5 – Pro for the HLVP system and I have no idea what sort of electric DA would be recommended. Spending money on tools does not bother me so I would really appreciate recommendations and thoughts on both the DA and the HVLP system.
Order of operations
Strip
Strip down the primer/paint on it down to SMC using DA (assuming this not a terrible plan) and hand sanding. Looks like 180 grit is recommended for stripping SMC.
Questions:
Car has no major damage anymore, though I did replace one panel and probably used the wrong filler based on more recent research (fiberglass filler versus SMC). My plan was V out the joint area and fill using Adtech P-17. Car is originally from Arizona and sat in the sun, resulting in little cracks in the paint and substrate. My understanding is that these need to ground down (mini grinder with wheel?) until they are gone and then filled with P-17 or another SMC filler and then sanded smooth
Questions:
Do I epoxy and then fill or fill then epoxy?
Paint with SPI Epoxy.
Wash the fiber glass with soap and water only. Let sit for 24 hours. Do not use wax or oil remover as they will do bad things with the SMC and paint adhesion. Paint the car with 2-3 coats of SPI epoxy and sand. And then perform one final coat to seal.
Questions:
Car is black so I read wait at least 45 minutes between base coat layers. I was going to go with the SPI black to keep manufacturer consistent. Looks like two to three coats is recommended.
Questions:
Do I need to sand the color?
Any benefits or harm to using more or fewer coats of base?
Spray clearcoat. Was going to use the Non-CA clear. 4-5 coats appears to be the recommendation. Lets sit, sand at leisure.
Questions:
None but comments welcome.
Cracks and SMC Layer Pictures
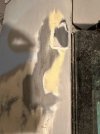
Image0 (1) is a picture where that shows the layers on the car. My question is what color is the "sand to this color" layer? is it that yellow color or the more grey color? Picture is from the rear quarter panel.
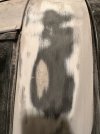
Image(1) is the same, on a different area on the car. I think the dark grey is the SMC, or do I go until I see yellow (or is the halo different then the quarter panel). Picture is from the halo.
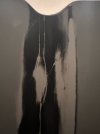
Image 2 are example pictures of the cracks in the paint. The picture is of the worst cracks and it is not sanded all the way down. My understanding is I fix these by sanding until they are gone, and then covering the area with Adtech P-17. Is this correct?
Image 8 is a typical crack in the finish. Do I use the same approach with these or do something else due to how minor they are?
Conclusion
Thanks if you managed to get through my wall of text. Any recommendations or corrections are greatly appreciated. Trying to do this right.
Hey guys, been reading around the forum and the internet in general (best help was here by far) for how to paint my 1990 Corvette. Pulled together some information and was hoping I could get input on my plan and if it is totally wrong or on the right track. All comment welcome and thanks for the help!
Car is a 1990 Corvette in black. I would like to repaint to black. Was an Arizona car and the paint is sun burned until it’s a chalk like consistency. I tried to get it painted in Arizona but, long story short the guy shot primer on it without sanding or doing more than masking the windows (I am going to need new taillights and such due to the primer on them) and pretty much ruined what little quality I had. At this point, I am going to do it myself since I can't really hurt the car anymore than it is and it is something I would like to learn.
Tool Discussion
I have a compressor but it is 5 SCFM at 90 PSI. No way to get a bigger compressor due to no 220V line and I would need a new electric panel for a new circuit as ours is full. My understanding is that this is not enough compressor for air sanding or for painting.
My thoughts for getting around this an electric DA and a turbine HLVP system. I would love recommendations for tools but my current plan would be an Apollo Precision 5 – Pro for the HLVP system and I have no idea what sort of electric DA would be recommended. Spending money on tools does not bother me so I would really appreciate recommendations and thoughts on both the DA and the HVLP system.
Order of operations
Strip
Strip down the primer/paint on it down to SMC using DA (assuming this not a terrible plan) and hand sanding. Looks like 180 grit is recommended for stripping SMC.
Questions:
- Can I use a DA or is this a no no on a Corvette?
- What color am I sanding too? I think it is the dark grey color in the picture but there is also that yellow color I have heard is the SMC. Anyone know?
- Is 180 the correct sanding grit? I have no idea on sand paper. I do know use auto sandpaper from an autobody store not home depot.
- Do I need to strip the urethane bumpers or can I just rough them up and spray with epoxy primer?
Car has no major damage anymore, though I did replace one panel and probably used the wrong filler based on more recent research (fiberglass filler versus SMC). My plan was V out the joint area and fill using Adtech P-17. Car is originally from Arizona and sat in the sun, resulting in little cracks in the paint and substrate. My understanding is that these need to ground down (mini grinder with wheel?) until they are gone and then filled with P-17 or another SMC filler and then sanded smooth
Questions:
Do I epoxy and then fill or fill then epoxy?
Paint with SPI Epoxy.
Wash the fiber glass with soap and water only. Let sit for 24 hours. Do not use wax or oil remover as they will do bad things with the SMC and paint adhesion. Paint the car with 2-3 coats of SPI epoxy and sand. And then perform one final coat to seal.
Questions:
- I read somewhere that the final coat of primer should be cut with more reducer?
- The forums mentioned using multiple coats of epoxy instead of the 2k primer for SMC. Is this correct or should it be 1-2 coats of epoxy, 2k primer, epoxy primer as sealer?
- Is my understanding of the “don’t use wax and oil removers correct? Is there another surface prep step I need?
- Do I still need to use a tack cloth before spraying layers or avoid that because SMC?
- Will Apollo HLVP system handle the epoxy primer? What about the 2k?
- Do I need to block between epoxy coats? What about sanding the sealing coat?
Car is black so I read wait at least 45 minutes between base coat layers. I was going to go with the SPI black to keep manufacturer consistent. Looks like two to three coats is recommended.
Questions:
Do I need to sand the color?
Any benefits or harm to using more or fewer coats of base?
Spray clearcoat. Was going to use the Non-CA clear. 4-5 coats appears to be the recommendation. Lets sit, sand at leisure.
Questions:
None but comments welcome.
Cracks and SMC Layer Pictures
Image0 (1) is a picture where that shows the layers on the car. My question is what color is the "sand to this color" layer? is it that yellow color or the more grey color? Picture is from the rear quarter panel.
Image(1) is the same, on a different area on the car. I think the dark grey is the SMC, or do I go until I see yellow (or is the halo different then the quarter panel). Picture is from the halo.
Image 2 are example pictures of the cracks in the paint. The picture is of the worst cracks and it is not sanded all the way down. My understanding is I fix these by sanding until they are gone, and then covering the area with Adtech P-17. Is this correct?
Image 8 is a typical crack in the finish. Do I use the same approach with these or do something else due to how minor they are?
Conclusion
Thanks if you managed to get through my wall of text. Any recommendations or corrections are greatly appreciated. Trying to do this right.

")