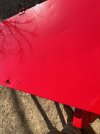
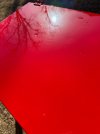
SPI SS Red Question

@HarleyJack , it doesn't look like you ran it anywhere, so probably more overlap would be good. I don't know about the FLG but its manual says it wants 35 PSI, so maybe you are on the low side even though you think you are not. I kinda think you need a better gun, you might be hitting the limitation of what it can do, also if you get an LPH or SATA then we can help more, because I don't think anyone here uses an FLG. I think that the 5% reducer might be a good thing to try also.
Nope, no runs...well one but it will be covered by side trim. I can't argue with any of what you said. I am really leaning more and more toward it needing some reduction. All things point to the paint not atomizing well in my limited experience. Looks like a warm day or two next week so I will do a little test and tune if I can.
 
im curious, are you regulating at the wall or at the gun? i have cheap guns, they seem to perform better with full pressure to a gun mounted reg. last i shot, 35psi on the gun trigger pulled. a little high but it worked well.
 
I have a Sata RP 5500 1.3 but I don’t think I’m man enough for that gun. :D I seem to get better results with my LPH400 1.4. Slower going but less wave.

Don
Lol run it wide open and hang on the 5000!series guns were even faster in y opinion I sprayed a 1.4 rp 5000 what a upset for me anyways
 
That is classic looking orange peel. Remember orange peel comes from lack of material going on the panel, runs come from too much material. Just judging from the pics, one, it looks like you are moving too fast for the gun you are using, or you need to open up the fluid more, and you need to tighten up overlap. Probably both. I would open up the fluid, tighten my overlap and see where I was at that point. Remember what I said earlier about watching the paint fill in as you are spraying. Adjust your speed to achieve that. You aren't as far off as you might think. Get the overlap right and be robotic, meaning consistent with your passes.

I don't know if you said what regulator you are using on the gun but if it's a non diaphragm one, throw it in the trash, and either get a good regulator (diaphragm) or try regulating at the wall. Use as short a hose as possible as well. 35 foot hose is ideal for spraying. You can use a 50 ft, but anything over that is not a good idea.
 
Don't use a "choke" valve anywhere, have a gauge at the base of the gun and regulate with a diaphragm regulator to the pressure you want at the gun with the trigger pulled.

Some say you need the diaphragm regulator at the gun, but I think it's fine on the wall as long as you don't kink the hose and set it to maintain the desired pressure at the gun. Standard backyard hack disclaimer.

Oh and plus 1 on the LPH400, the set up instructions on here will have you spraying like a pro.
 
I have not got around to it yet, but I am going to spray a couple of junky metal cabinet doors I have to see what is what. I'm sure reducing it is the solution at least for the gallon I have, and the tools I am using. I need to get it figured out as I am getting close to being ready to spray the hood.
 
I have not got around to it yet, but I am going to spray a couple of junky metal cabinet doors I have to see what is what. I'm sure reducing it is the solution at least for the gallon I have, and the tools I am using. I need to get it figured out as I am getting close to being ready to spray the hood.

You mentioned of spraying and then coming back and seeing way more orange peel than when it went on. This was a problem I fought for quite a while doing work outside of a large, dedicated paint room of ample volume. I got around this and most of the time it is glass on my good stuff by getting it where I think it needs to be on my sample test piece first. Sometimes it was more than a couple of tries. But I know now what variables are apt to lead me where I want to be without it being a mystery. But I know now how to compensate for my choice of guns, how much overlap--speed of my movement, etc...... My work before resembled yours. I needed to up my airflow through my spray guns.

Hang in there and try what people advise and see what works for you.

People always talk about how something sprays--the other part is how that sprayed material behaves on what it lands on.

I use a 4'x5' piece of 20 sheet steel gauge hanging on the wall that is my set-up piece--since I only use my equipment on occasion. I use an inexpensive plastic Earlex brand Ford #4 viscosity cup ($4.95USD) and time with a watch and keep my SATA one for a reference. I just swish this plastic cup in my nasty can of used thinners/reducer/xylene/laquear thinner to clean it and not rub it dry. All the single stage I use is timed /reduced to run 14-18 seconds in that Ford cup or 19-22 seconds in a Zahn #2 cup at 70-75F. Some paint manufacturers list a Zahn# 2 cup with a timing in seconds. The Zahn cup uses a smaller hole and is harder for me to see it at the final drain out. I use both but prefer the Ford #4. They are accurate to my SATA one to 1/3 second timing with a Swiss made stop-watch and however accurately I can tell when the last of the exits the end of the opening in the viscosity cup.

Once I have that timed inside in the house or controlled temp place--I change-out my fluid nozzle, air cap and needle to compensate for higher or lower temps or humidity are where spraying will be. I change out the guts of the gun to match and leave the paint alone. If it is a bit cooler--I heat on a hot plate and get it 75F. I match my activator to environmental conditions per what that manufacturer recommends and usually go one higher temp. range on my reducer. Then I consider if I will go up or down on my fluid nozzle orifice and the same on the air cap. Colder days--smaller fluid nozzle and bigger air cap. Some needles that are for the next sized down fluid nozzle will work fine and allow for a touch more fluid output for a fine tune. I can just run the adjuster in or out on the end of the needle to make sure it does not overly protrude from the fluid nozzle and still seals. I do this on my touch-up guns.

My experience is CFM x PSI should be somewhere about 300 as an idealized number--on a full-sized production RP, HVLP, conventional spray gun and most can be made to perform well but it is not likely with one gun set-up of fluid tip, needle, nozzle unless you can adjust your environment by temp/humidity and airflow. That multiplication product is in units of power (time rate of doing work). The CFM number the manufacturer states is the minimum flow through--not the amount you might need for what product you intend to spray and where you are spraying. Using a vane type anemometer and 8" long piece of cardboard shipping tube measuring gets you a better estimate on CFM out your gun and from however many restrictions you've put in your piping/hose--then you can fine tune pressure at the wall with the gun trigger pulled completely open. If you need a bit more volume--go to a 1/2" hose and measure the flow difference from a 5/16" or 3/8" one.

For folks who have this urethane wave problem mentioned on this forum--might want to check the air velocity exiting your gun with an anemometer for feet/sec. and a just lower by increasing your CFM flow a tad and decreasing your spraying pressure. Higher spraying pressures often are associated with higher air velocities out the gun impacting the substrate being sprayed.
 
Last edited:
I got around to spraying a test panel. Quick hit with a DA just to scuff up the surface...these metal doors were rough(I mean bad rough)!!! I did not try to get them smooth, or blend the chips/dents/scratches out etc...this was ONLY to test out reducing the SPi SS Red to see the impact on orange peel with my setup. Temp was little warmer 75 in the sun. Done outside vs. inside on the fenders.
You can see it laid out better, and I could(had) to move much faster. This was reduced between 3-5% with 885 reducer. Spraying at 32-35 psi. Again, ignore everything minus the leveling/texture of the paint...this is what I was expecting on the first round on the fenders. I feel this would be an acceptable final finish for a driver, or not too bad to massage later. I will move on to spraying the hood and doors now I believe. Trust me, the pics do not do it justice as the doors were terrible things to paint. The paint itself laid out much better being reduced.

Any good suggestions on fixing the two fenders? Sand to flatten and re-spray?
 

Attachments

  • IMG_0692.jpg
    IMG_0692.jpg
    85.6 KB · Views: 49
  • IMG_0693.jpg
    IMG_0693.jpg
    39.4 KB · Views: 51
  • IMG_0694.jpg
    IMG_0694.jpg
    60.4 KB · Views: 48
Update: Sprayed the hood (1975 F250) over the weekend. Reduced the SPi SS Red by 10%. This made a huge difference. Same gun, same setup. FLG-5 35 psi. It was a bit cooler in the garage...65 vs 70 most likely. You can see how smooth it laid out. Not perfect but I could not ask for better, it really flowed out. However, there is a lot of debris in the paint. That is an entirely different story and not related at all to the paint. Live and learn. Anyway, I wanted to update the thread. At least for me, and the batch of paint I have, reducing seems to be the answer.
Ford Hood 1.jpg
Ford Hood 2.jpg
Ford Hood 3.jpg
Ford Hood 4.jpg
 
Last edited:
Back
Top